

The technician view displays a simple map and listings of the current day’s services that are assigned to the logged in user. Technicians will be able to preview their route for the day and also can click to view details about each service, which includes Customer, Property, and Service History details. Technicians cannot view outstanding invoices or balances due.
Technicians will receive an email notification each time a new service is assigned to them. Each service assigned to them will also show up on their Daily View route when they login.
How to View a Summary of Your Route
- To view a summary of your route from the technician screen, you will click on the "Route Summary" button at the top of the technician dashboard. This will show you drive time, mileage, service summaries, and product summaries. These should be helpful for a technicians when loading their trucks and planning their day.

With automated route optimization, Spraye instantly syncs your stops with mapping servers to calculate and apply the most efficient driving sequence to your field schedule automatically. Technicians will see the optimized route automatically.
Before you begin organizing your daily stops, take a moment to read our guide on Understanding Route Optimization to see how the system handles your data.
How to View Future Days
- To view routes and summaries for future days, simply click on the "See Future Scheduled Routes" button at the top of the technician dashboard. Then pick the date you would like to view. There you will be able to see route summaries and stops for future days (and you can even complete services scheduled for future days).

How to Complete a Service
- To begin your route for the day, simply click the customer/property name in the list view below the map. If you prefer to go out of order, click any stop to get started. Once you complete that stop, you'll see an option to Update Route. By clicking this, Spraye will re-optimize the remaining stops in the route for you.
- Click Get Directions under the map to use Google Maps to navigate to the stop.
- Once you arrive at the stop, you will be able to see the Service Details, product details, property notes, and any general notes about the customer. You can also email the customer directly from this screen if needed.
- When you click Start Service, you will be prompted to enter the wind speed. You can then submit and proceed with the service, or you can click Skip Service/Reschedule. If for some reason you cannot complete the service and need to skip, you can come back to it at a later time (it will need to be reassigned from the Admin dashboard).
- Once you complete the service, click Complete Service and it will give you an option to send a custom message to the customer. It will automatically generate an email to the customer letting them know their service was completed as long as you have the Service Completion email turned on in your main settings.
- Once you send the message, you will then be able to email and/or print an invoice for the customer. Even if you do not print an invoice at this time, the system automatically generates an invoice for each completed service that is available to be sent from within the Active Invoices section of the admin view.
- Once you email or print the invoice and click OK, you will automatically be redirected back to the Technician Dashboard where you can proceed to the next stop by clicking on the customer/property name.
- Once you have completed each stop on your route, the map and list views will be empty and you're finished for the day.
Handling Multiple Scheduled Services
When multiple applications or services are scheduled for the same property on the same day, technicians currently cannot split or partially complete the job directly from the mobile app.
If a property shows two scheduled applications but the technician only completes one, follow the workaround below to ensure accurate record-keeping and billing.
Current Workaround: Adjusting Services via Admin
To avoid accidentally marking both services complete, technicians must contact administrative staff before finalizing the job in the field.
- Do Not Tap Complete: The technician should perform the single application as normal, but do not press "Complete" in the mobile app.
- Contact Admin: The technician contacts Admin personnel while on-site or before completing the stop.
- Remove Unperformed Service: The Admin removes or reschedules the unperformed service from that day's work route.
- Complete the Remaining Service: Once the unperformed service is removed, the technician completes the single remaining application in the app.
Note: Pressing "Complete" while multiple services are listed will mark all attached applications as finished, which may lead to incorrect customer history and improper billing.
Outstanding Services Table
The Outstanding Services section provides technicians with a clear summary of upcoming or uncompleted treatments assigned to a customer's property.
Data Fields
The Outstanding Services table displays the following key details for each service:
- Service Name: The specific application or task to be performed.
- Program Name: The program the service belongs.
- Completion Status: Indicates the current operational state of the job:
• Scheduled: The service has been assigned to a route/date for completion.
• Pending: The service is part of an active program but has not yet been scheduled on a route. - Cost: The rate or price charged to the customer for that specific visit. Note: the cost will only show if the Show service pricing on technician screen option is enabled on the Global Settings page.
Table Tools & Navigation
- Search Bar: Quickly locate specific services or applications by typing keywords into the search box above the table.
- Sort Controls: Click the double arrows next to any column header (Service Name, Completion Status, Cost) to sort entries alphabetically or numerically.
- Show Entries Dropdown: Adjust the number of visible rows per page (e.g., 10, 25, 50) using the Show dropdown at the top right.
- Pagination: Use the arrows or page numbers at the bottom right to navigate through additional pages of services.

Completed Services
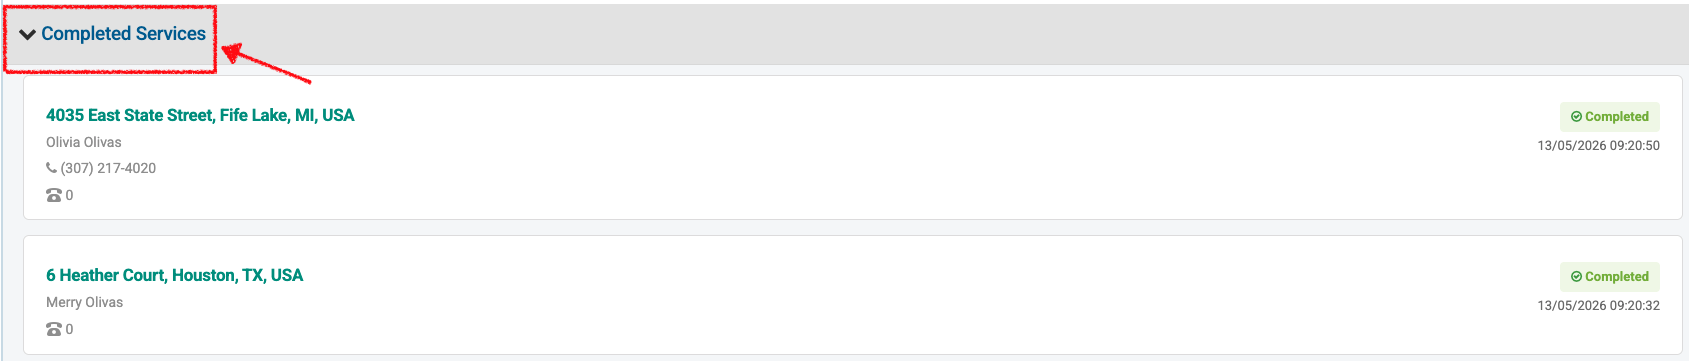
To improve workflow continuity and data access, completed services will remain visible and accessible throughout the workday at the bottom of the Technician view. Click the Completed Services header to reveal a list of your finished stops for the day.
Persistent Visibility
- Active Duration: Completed stops stay on the screen for the remainder of the current business day.
- End-of-Day Reset: All stops (including completed ones) will be cleared from the view at the start of the next day.
Visual Indicators
To differentiate between pending tasks and finished work, completed stops will look greyed out.
Status Labeling: A prominent "Completed" label will be added to the card as well as the date and time each service was completed.