
SPRAYE's Interactive Estimates let your customers choose their packages, programs, add-ons and billing method online, then accept with one click. The Interactive Estimate Builder makes it faster to build, price and send them.
The builder walks you through three short steps (Setup, Offer and Review & Send) with a live preview of exactly what your customer will see.
We recommend reviewing this guide before sending your first estimates with it.
Still seeing the previous estimate form? Your account may not have the new builder yet. See Legacy: Creating an Estimate with the Previous Builder near the end of this article.
What's new in the Estimate Builder?
- Start from a template in one click: programs, pricing and prepay settings come pre-filled.
- Packages, required programs and optional add-ons on one screen, in any mix.
- Price overrides and coupons per service, right on each program card.
- Skip this season: pick a service once and it's skipped everywhere on the estimate.
- Live preview of the customer's estimate while you build it.
- Totals for every billing option (Prepay, Pay As You Go and Monthly Installments) before you send.
- Bulk mode to send the same offer to multiple properties, with per-property price overrides.
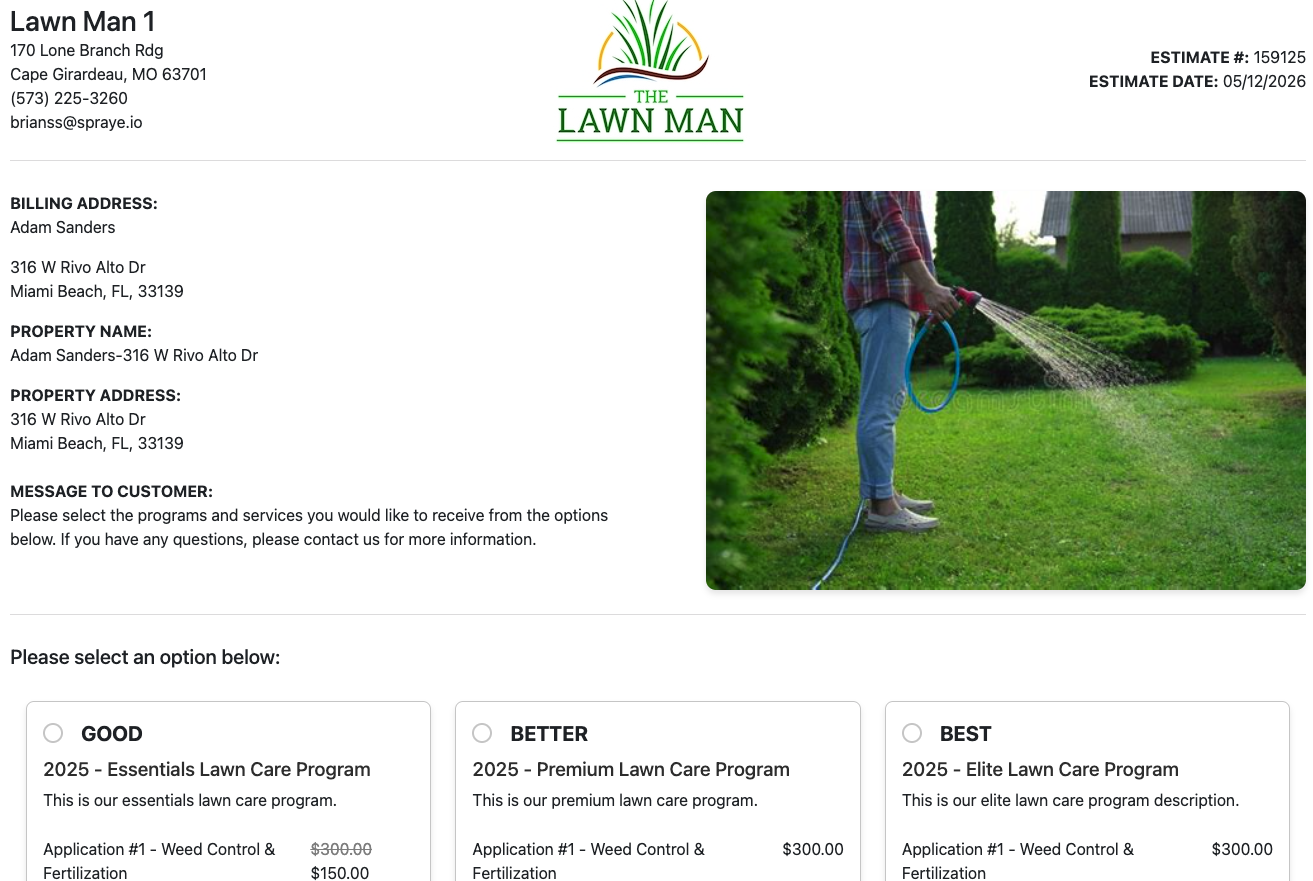
Here's an example of an Interactive Estimate your customer receives:
Customizing Package Tier Names
You are not limited to the "Good, Better, Best" naming convention for your multiple package estimates. You can fully customize these labels to match your company's branding.
How to Change Names: On the Main Settings page in the Estimates Settings section, enter the package names you'd like to use.
Examples: You can rename tiers to things like "Basic / Preferred / Ultimate" or "Bronze / Silver / Gold."
Visibility: These custom names will appear on the customer-facing Interactive Estimate and the final PDF version of an interactive estimate.
Before You Begin
A few things make the new builder faster to use:
- Interactive Estimate templates: if you already have templates, they appear in the builder automatically. Templates are the quickest way to start.
- Package names: your package tier names come from your Estimates settings. See Customizing Package Tier Names above.
- Monthly Installments (optional): the Monthly Installments billing option only appears if Monthly Installments is set up for your company. See Monthly Installment Billing: Getting Started.
To open the builder, go to:
Estimates → Interactive Estimates → Create New Estimate
Step 1. Choose How to Start
The first screen asks How do you want to start?
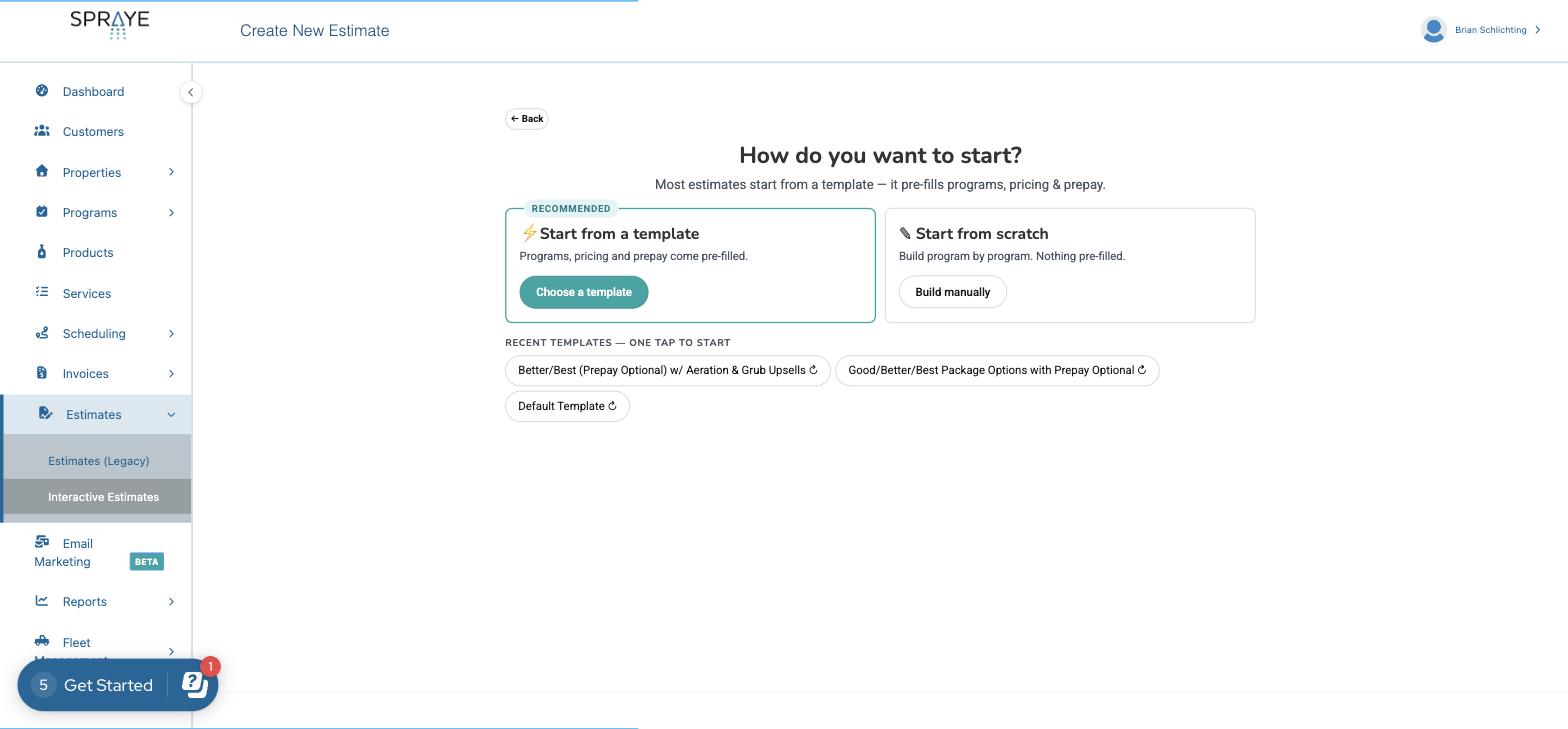
Option 1: Start from a template (recommended)
Click Choose a template, then click Use template next to the template you want. Programs, pricing and prepay settings from that template are pre-filled. You can still change anything before you send.
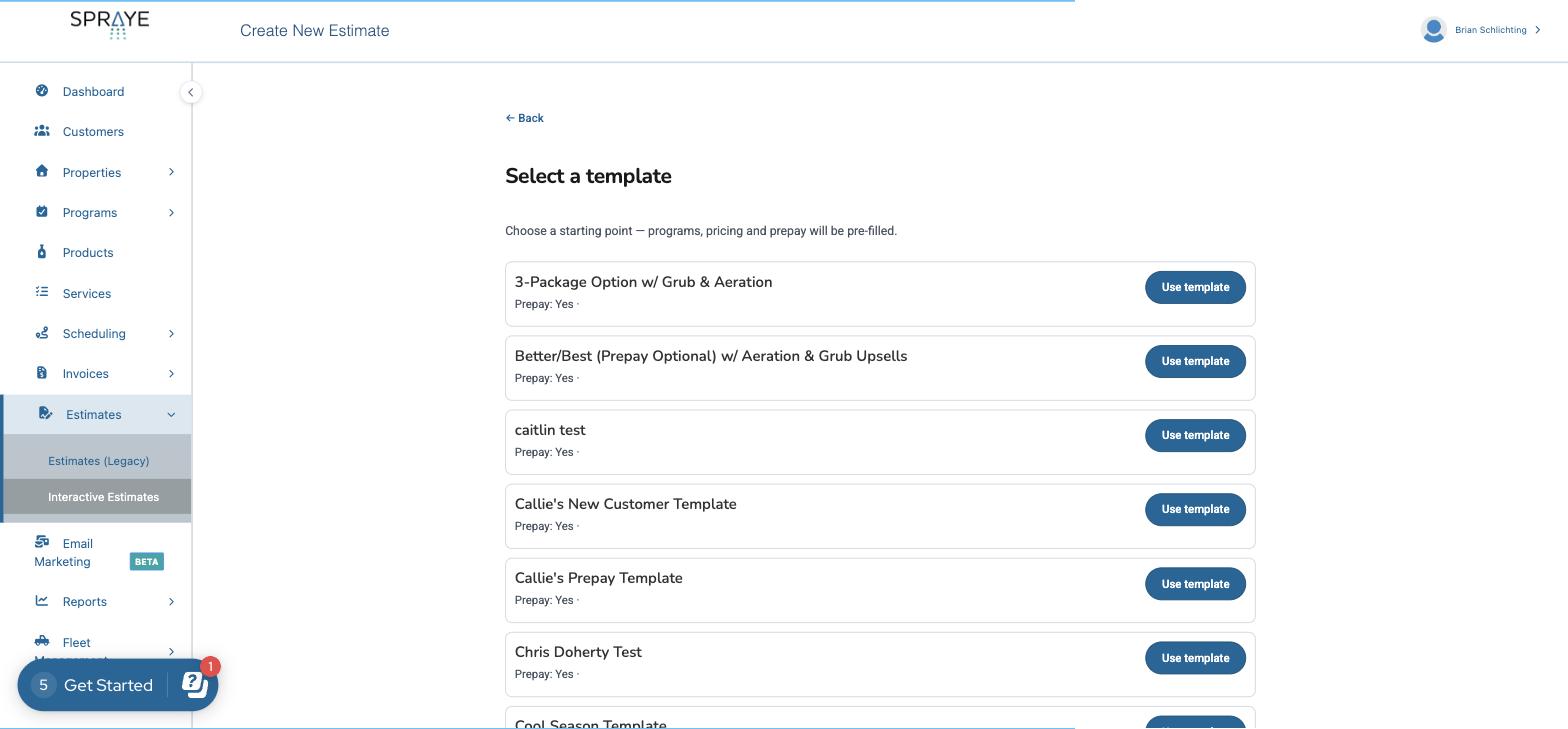
Tip: your most recently used templates appear under Recent Templates on the first screen. Click one to skip the template list.
Option 2: Start from scratch
Click Build manually to build the estimate program by program with nothing pre-filled.
Step 2. Offer Setup
On the Setup step you choose who the estimate is for and which billing methods to offer.
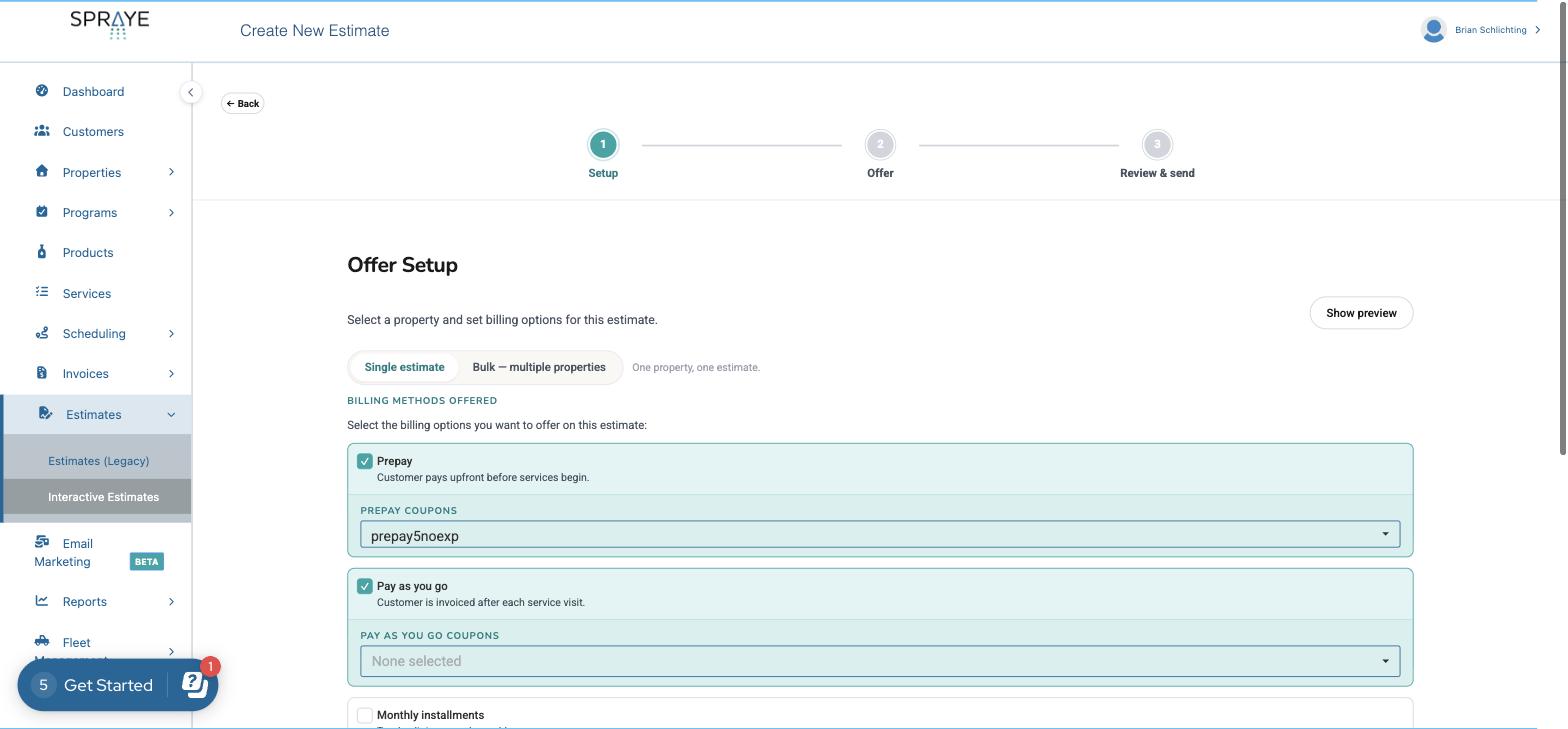
1. Choose Single or Bulk
- Single estimate: one property, one estimate.
- Bulk – multiple properties: send the same offer to several properties at once. See Sending Estimates in Bulk below.
2. Select the Billing Methods Offered
Check each billing option you want the customer to be able to choose:
- Prepay: the customer pays upfront before services begin. You can attach Prepay Coupons.
- Pay as you go: the customer is invoiced after each service visit. You can attach Pay As You Go Coupons.
- Monthly installments: the total is split into equal monthly payments. Only programs with Offer Monthly Installment Billing enabled are eligible.
If you started from a template, these are already set to the template's defaults.
3. Add Estimate Details (optional)
Expand Estimate details to set:
- Message to Customer: shown at the top of the estimate.
- Sales Rep and Lead Source
- Estimate Image: an optional property photo (suggested size 600×400 px).
4. Find the Property
Under Find Property, type at least 2 characters of the customer's name or address and check the property. Use Filters to narrow the list.
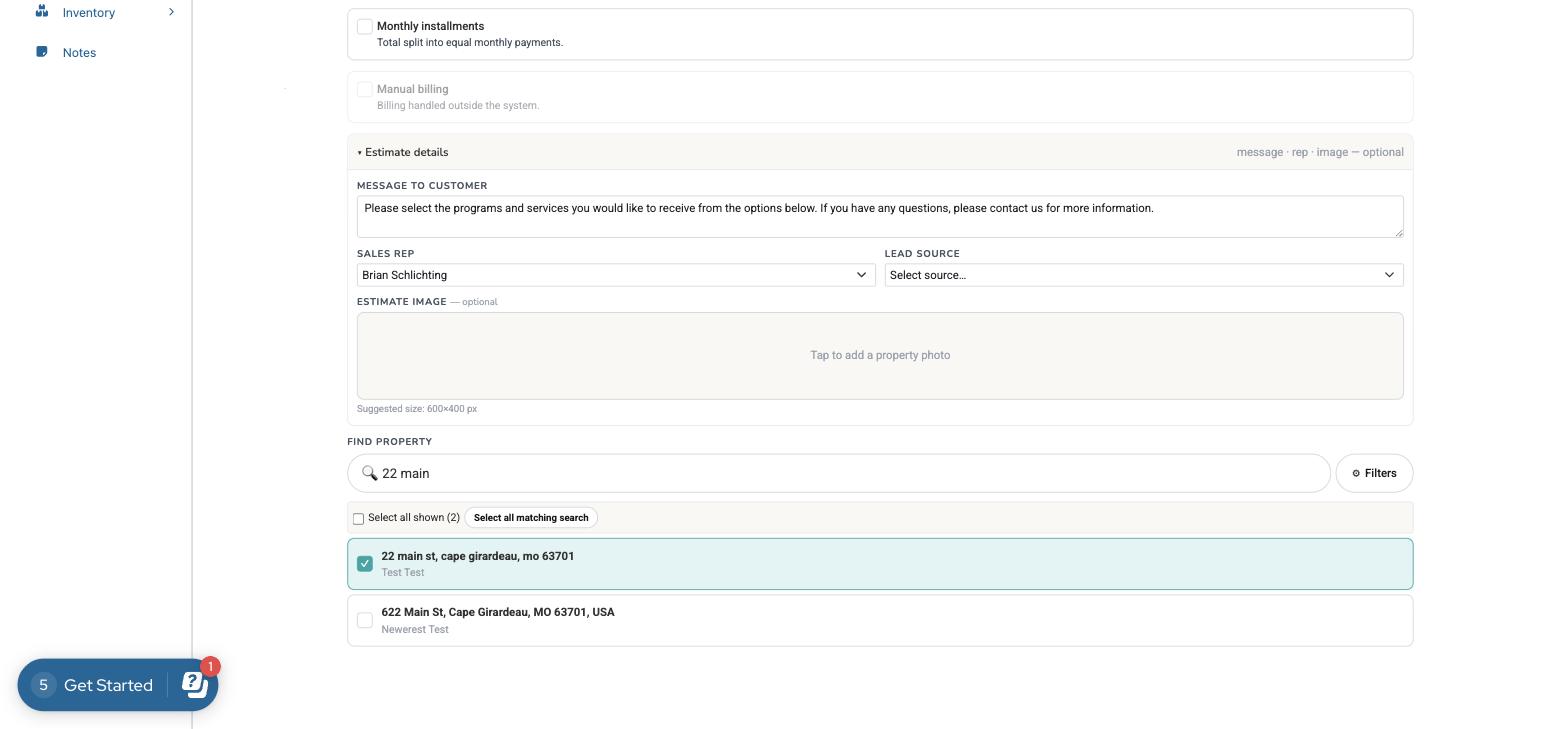
Click Next: Build the offer → to continue.
Step 3. Build the Offer
This is where you decide what the customer can choose. Pricing and billing live on each card, so you can see and adjust everything in one place.
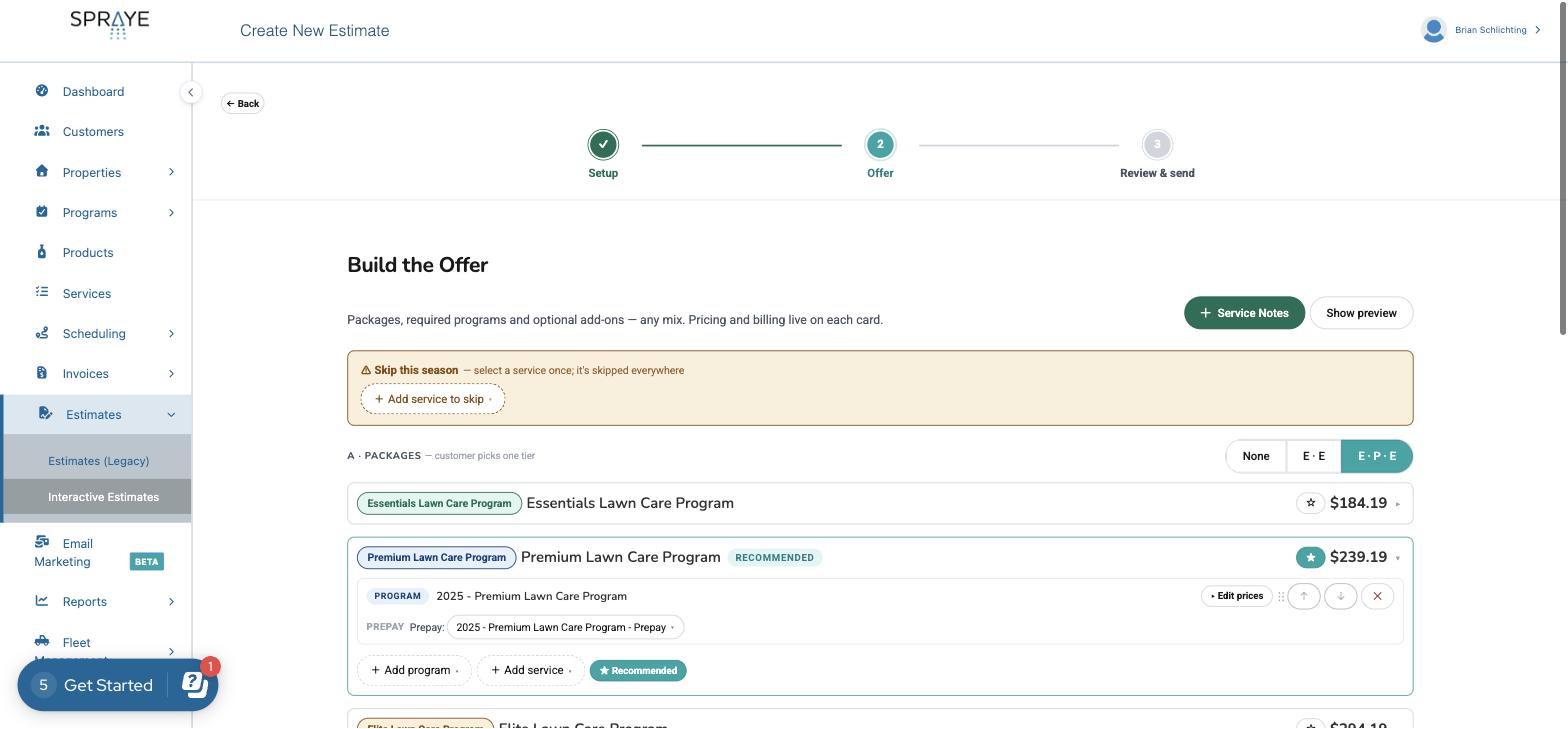
Skip this season
Click + Add service to skip to pick any service that shouldn't be performed this season. Select it once and it's skipped everywhere on the estimate.
A · Packages (customer picks one tier)
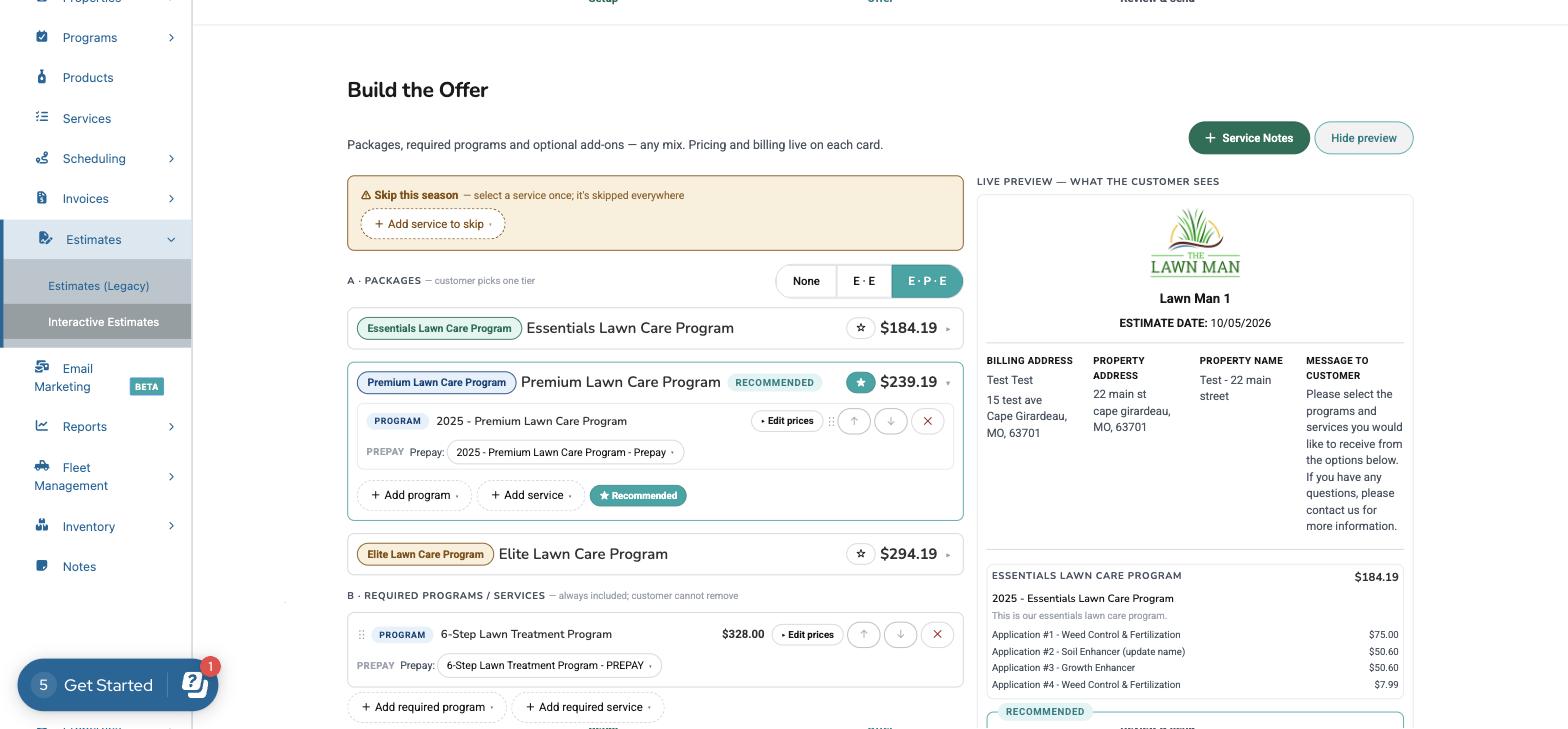
Packages let the customer choose one tier, such as Good / Better / Best. Use the toggle on the right to show None, two tiers or three tiers. The toggle labels use the first letter of each tier name (for example E·P·E for Essentials · Premium · Elite).
- Click a package to expand it and add programs or services to that tier.
- Click the ☆ star to mark a package as Recommended. It's highlighted for the customer.
- Use the ↑ / ↓ arrows to reorder items, or ✕ to remove them.
B · Required Programs / Services
Items here are always included. The customer cannot remove them. Use + Add required program or + Add required service.
C · Optional Add-Ons
Items here are extras the customer can add or remove, such as grub control or aeration. Use + Add program or + Add service.
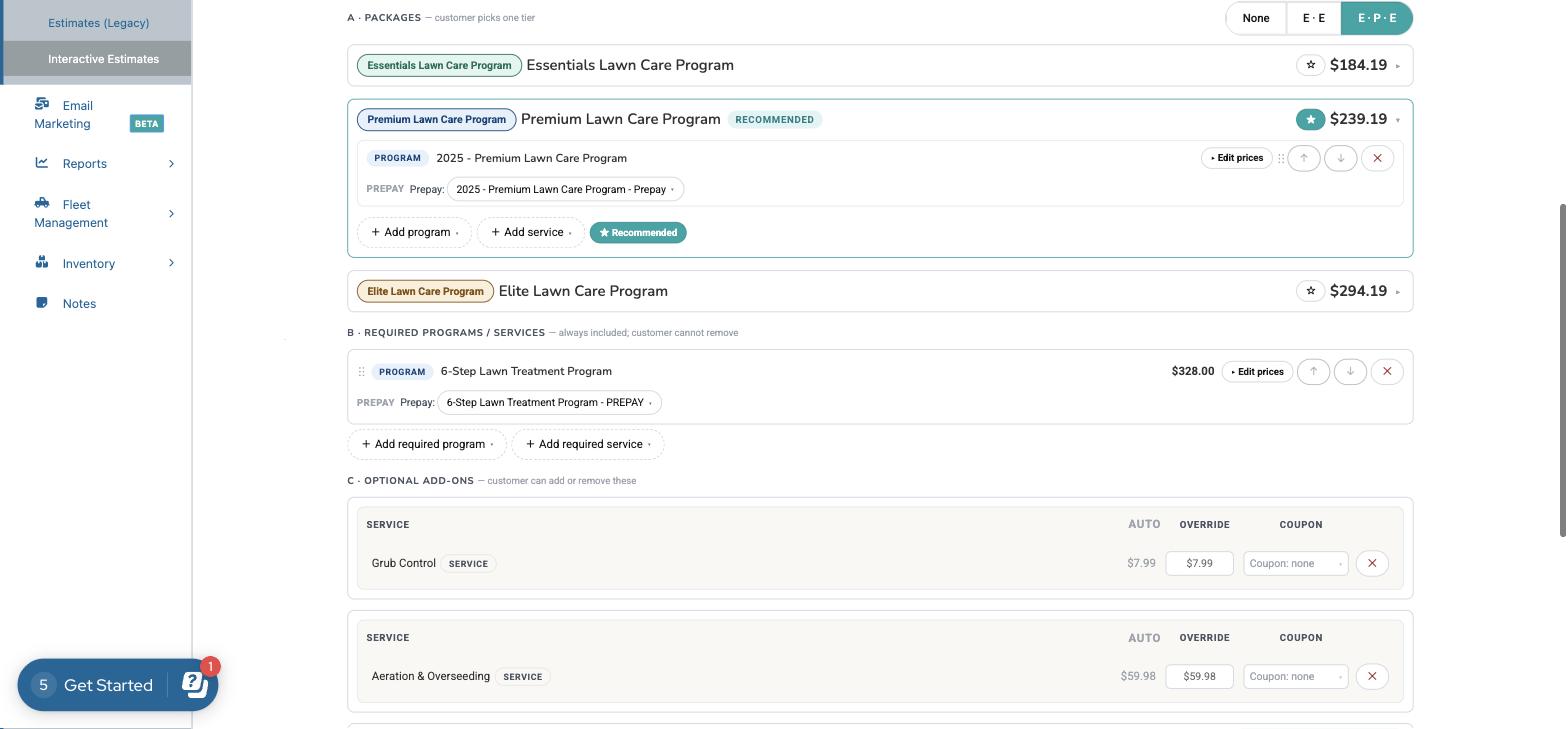
Adjusting prices and coupons
Click Edit prices on any program to see each service's price:
- Auto: the price SPRAYE calculated for this property.
- Override: type a different price for this estimate.
- Coupon: apply a coupon to an individual service.
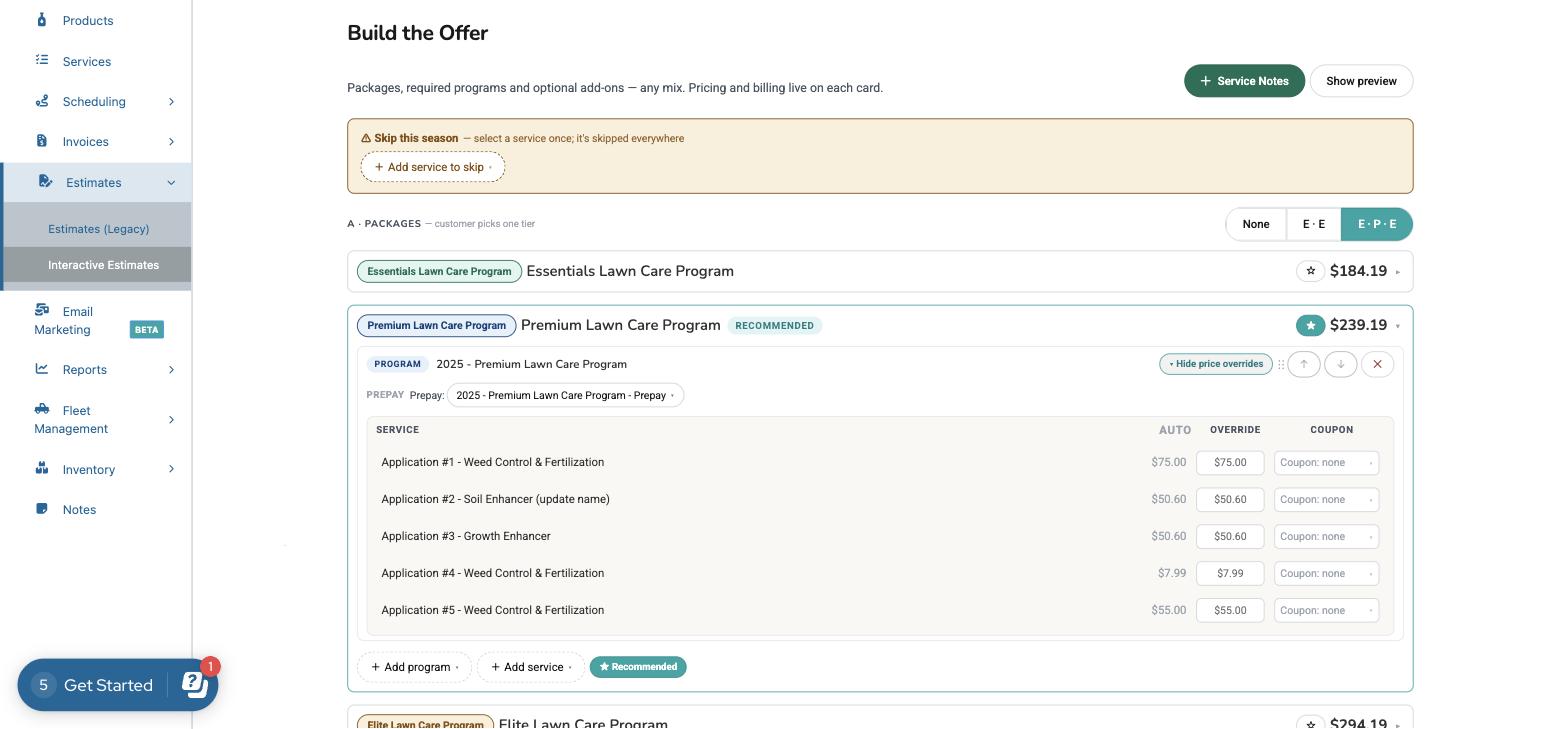
Choosing the prepay program
When you offer both Prepay and Pay as you go, every pay-as-you-go program on the estimate needs a linked prepay program. That's the version of the program the customer is enrolled in if they choose to prepay. If the program already has a matching prepay program, SPRAYE fills it in automatically and you'll see it next to Prepay: on the card.
If no prepay program is linked, the card is outlined in orange and shows Prepay: Choose…:
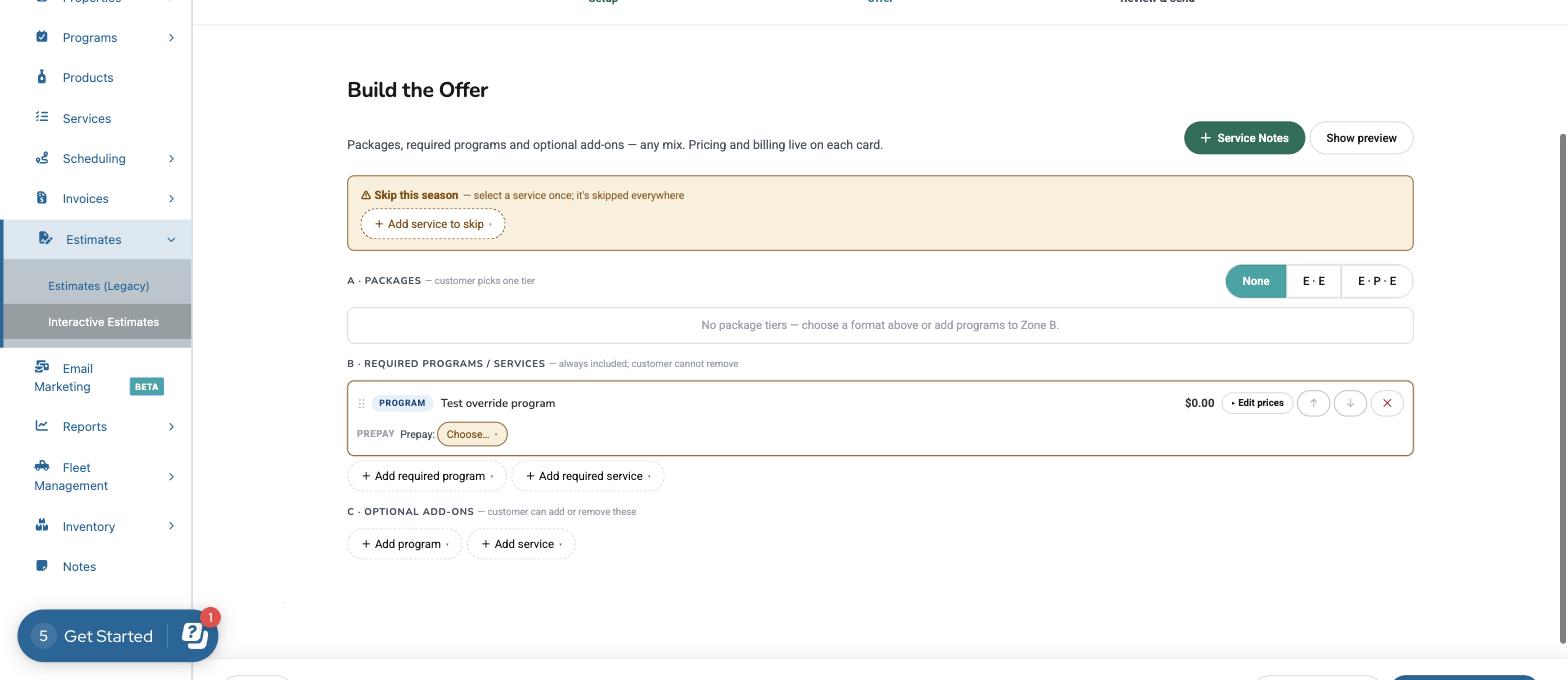
- Click Choose… next to Prepay:.
- Search for and select the matching prepay program (for example, 4-Step Lawn Treatment Program - PREPAY).
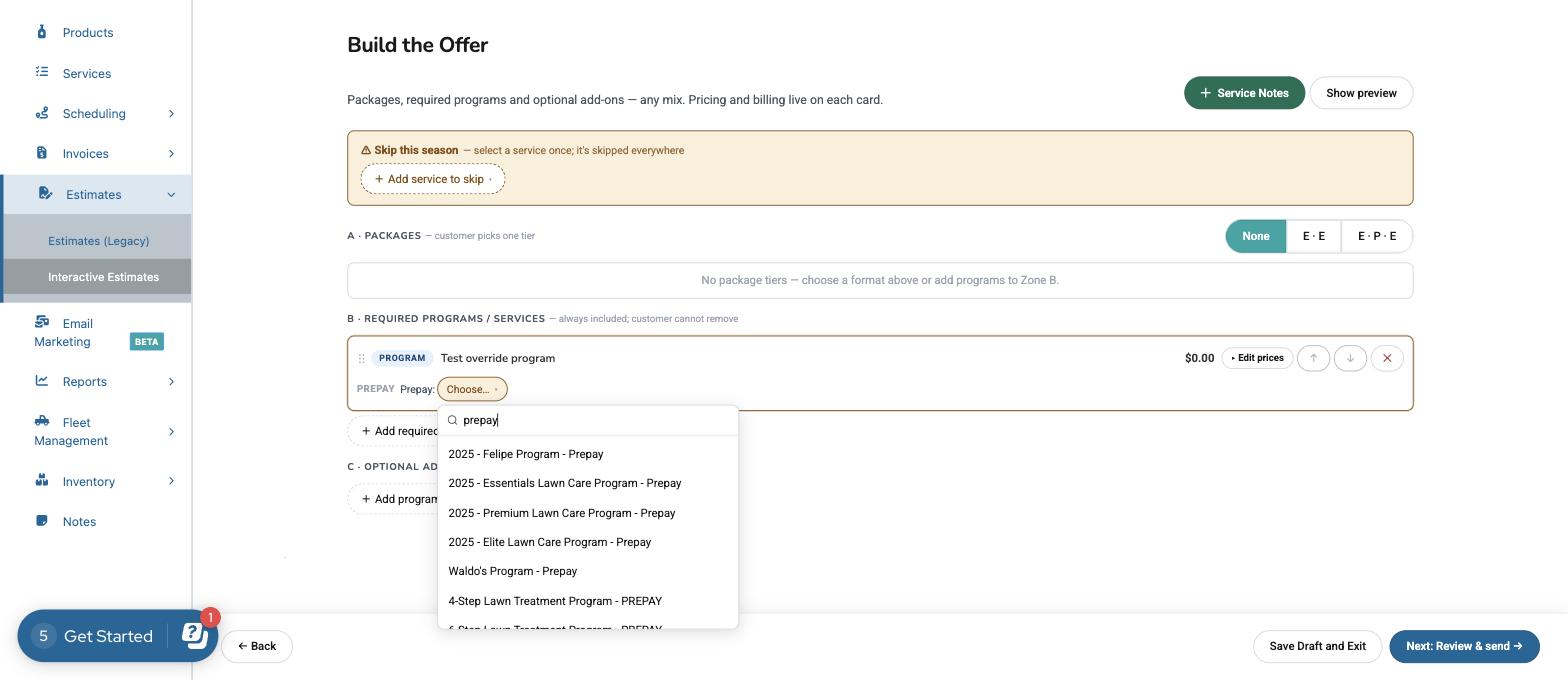
Once a prepay program is selected, the orange outline goes away. To change it later, click the prepay program name next to Prepay: and pick a different one.
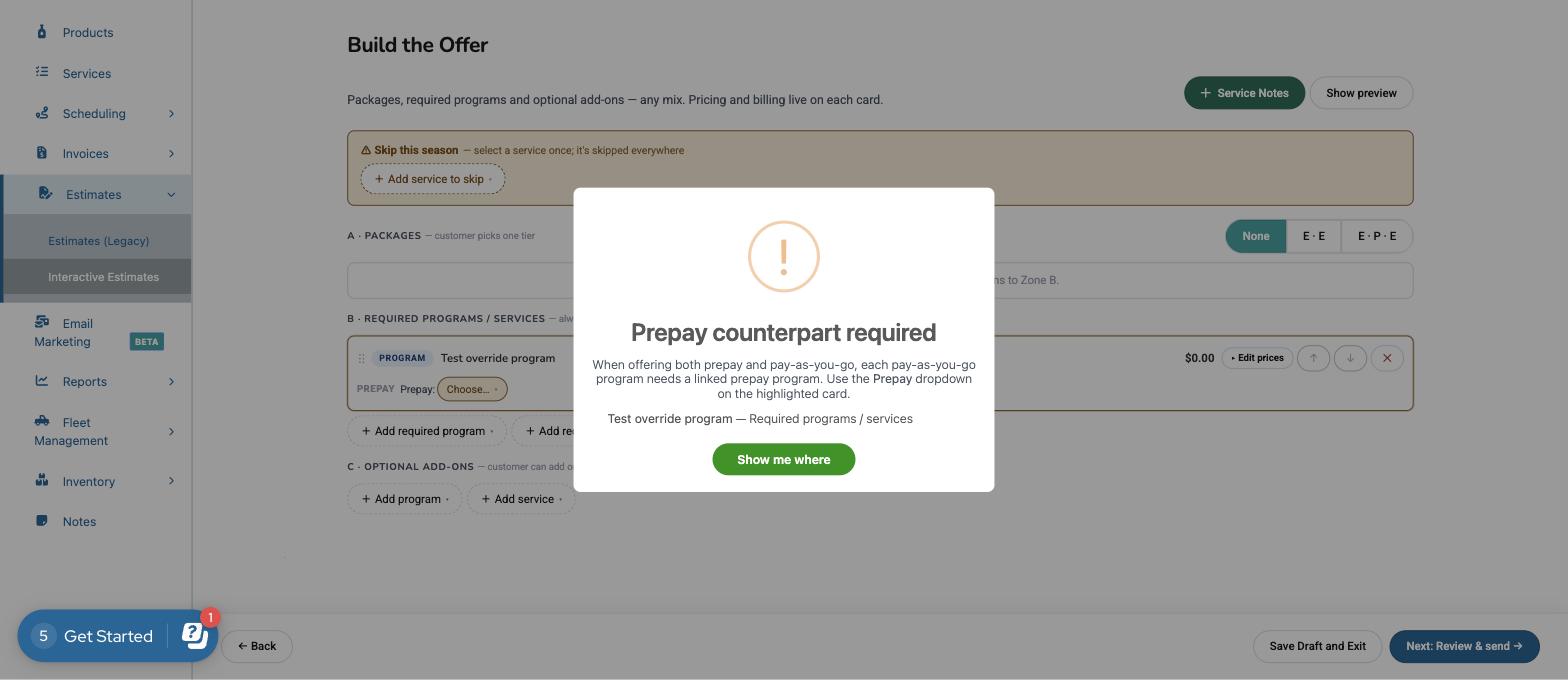
Tip: If you click Next: Review & send → while a program still needs a prepay program, SPRAYE shows a Prepay counterpart required message that lists which programs need one. Click Show me where to go back to the highlighted card.
Service Notes and Live Preview
- + Service Notes: add service-specific notes to the estimate.
- Show preview: opens a live preview of exactly what the customer will see. It updates as you make changes.
Click Next: Review & send → to continue.
Step 4. Review & Send
The final step shows the estimate exactly as the customer will receive it, with a summary of the billing methods offered.
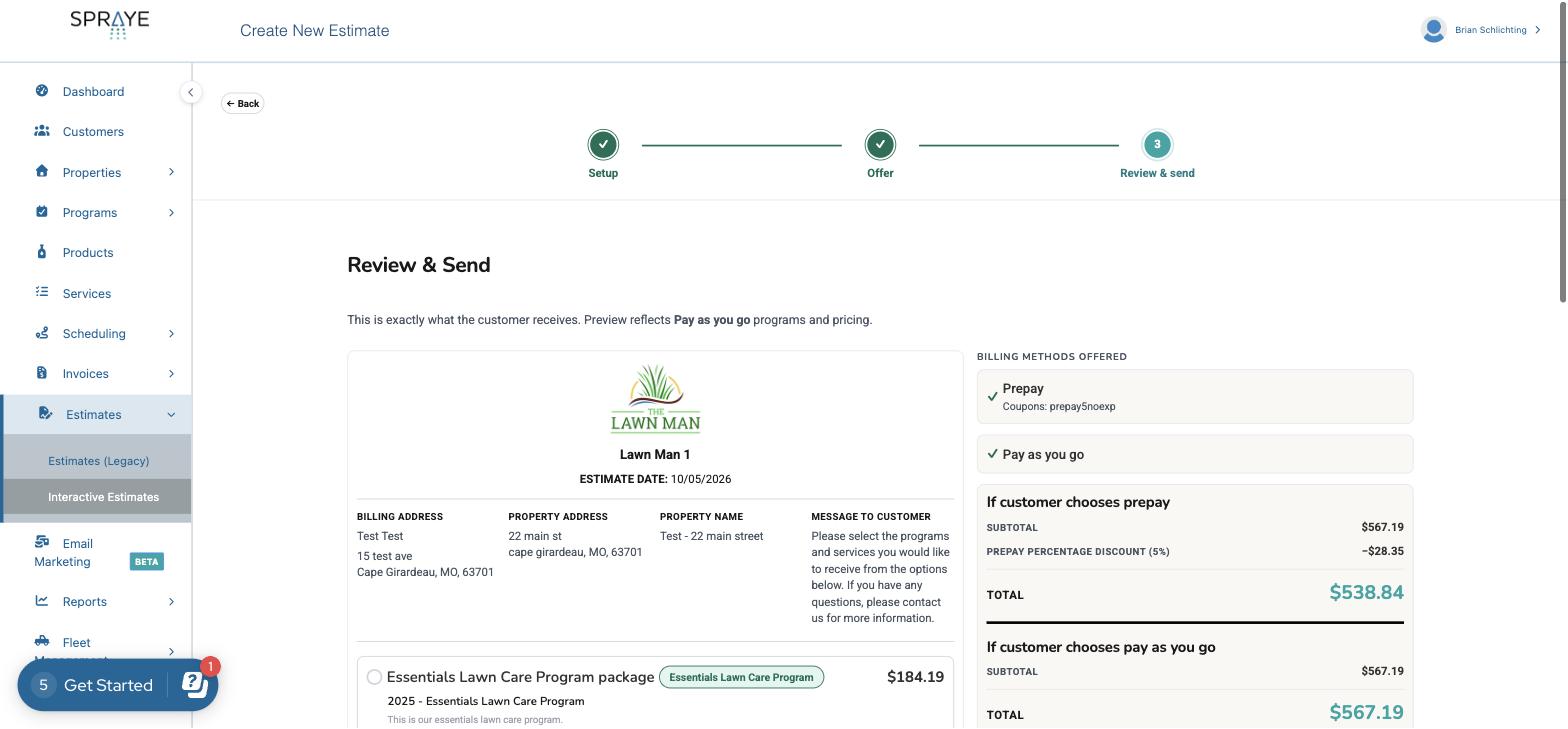
On the right, SPRAYE shows the totals for each billing option you offered, for example If customer chooses prepay (including any prepay discount) and If customer chooses pay as you go. Use this to double-check pricing before you send.
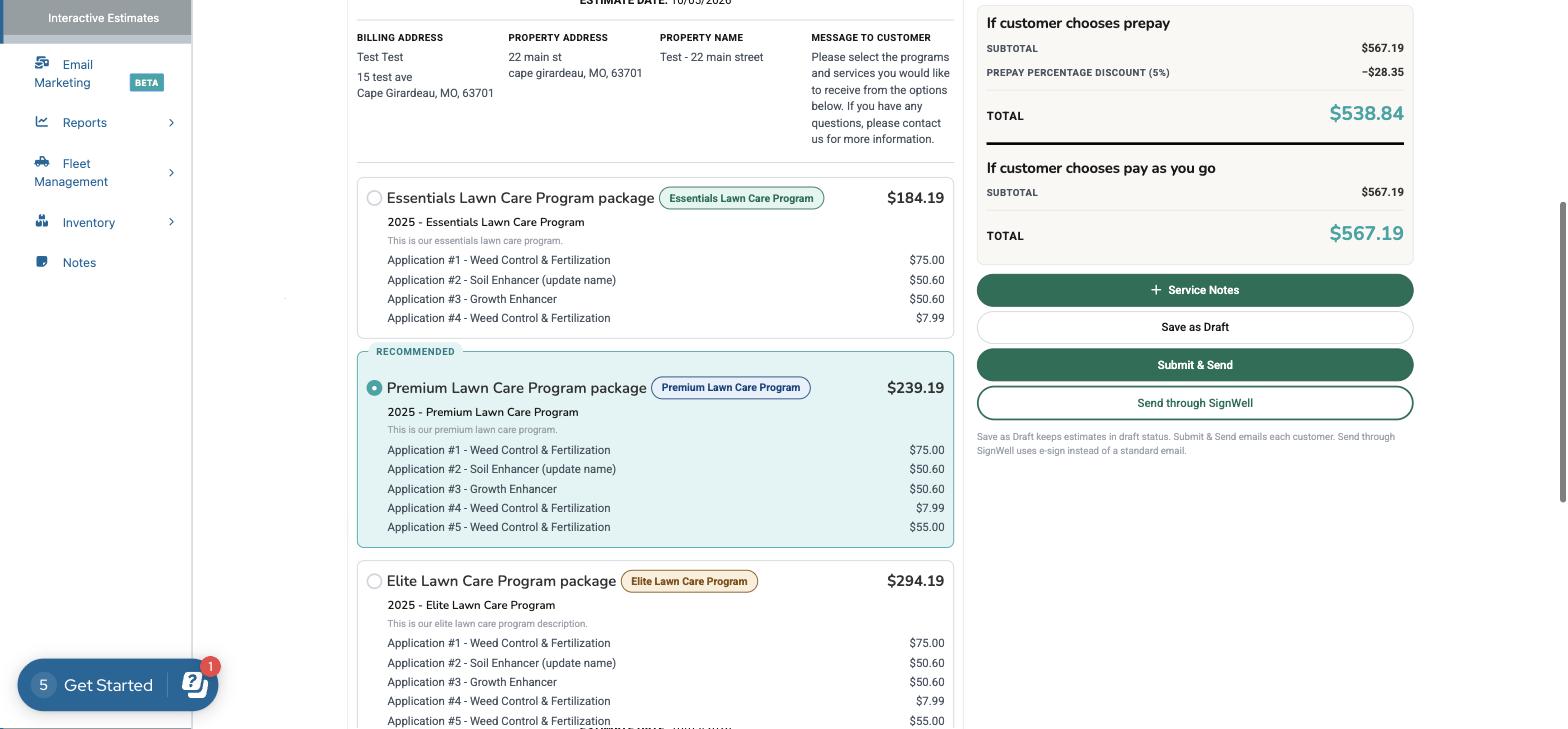
When you're ready, choose how to send it:
- Save as Draft: keeps the estimate in draft status so you can finish it later.
- Submit & Send: emails the estimate to the customer.
- Send through SignWell: sends the estimate for e-signature instead of a standard email.
Tip: Save Draft and Exit is available on every step, so you can stop at any point without losing your work.
Sending Estimates in Bulk
Bulk mode lets you build one offer and send it to many properties at once. SPRAYE creates a separate estimate for each property, and each property is priced individually.
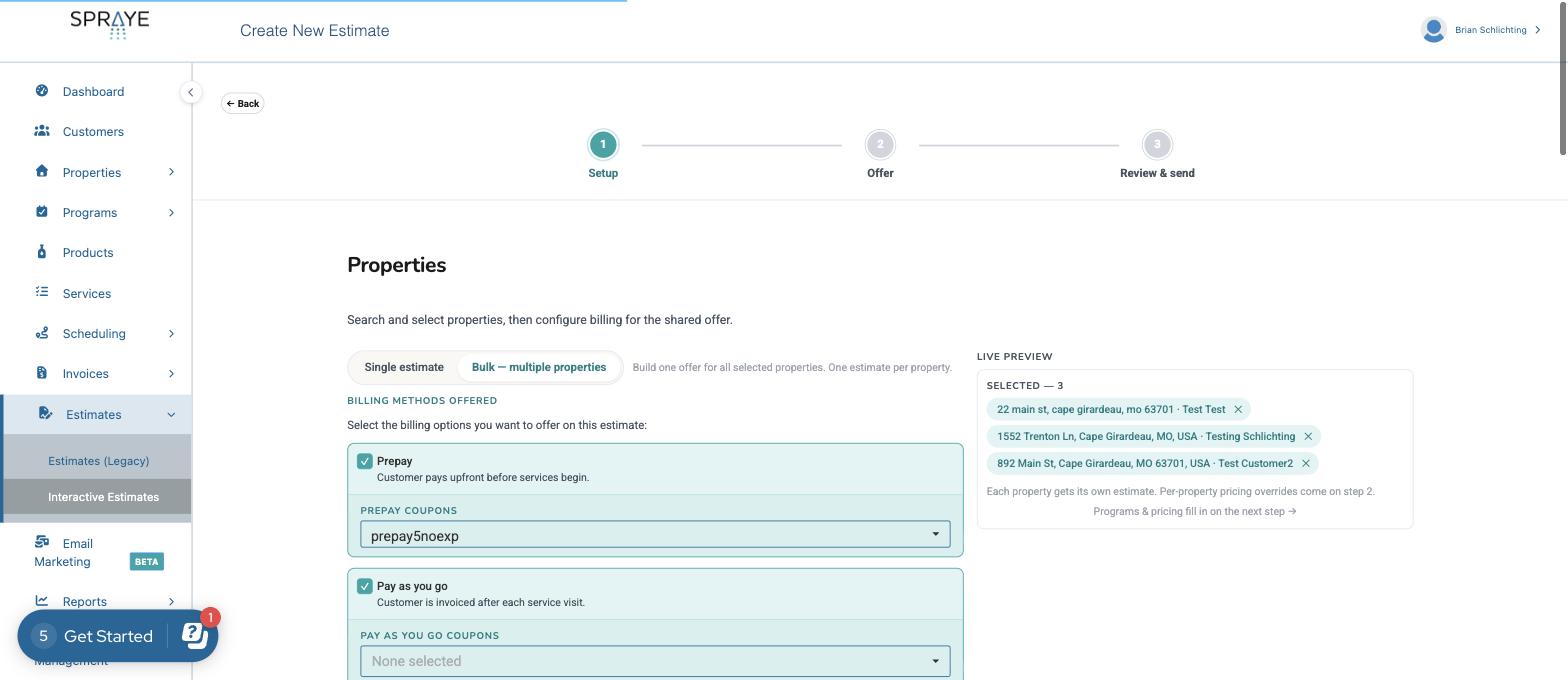
1. Select the properties
On the Setup step, choose Bulk – multiple properties. Search or use Filters to find properties, then check each one, or use Select all shown / Select all matching search. Selected properties are listed in the Live Preview panel on the right. Click ✕ to remove one.
2. Build the offer and adjust per-property pricing
Build the offer once, exactly as you would for a single estimate. It applies to every selected property. Each property starts with its own auto pricing. Click Edit prices on a program or service to open the bulk price table:
- All properties (green row): choose a coupon for each service. It applies to every selected property.
- Property rows: type an override price for a specific property, only when its auto pricing needs adjusting. Use set each to enter one price for every service in that row.
- Search, Only with overrides and Per page (10 / 25 / 50) help you find properties in large lists.
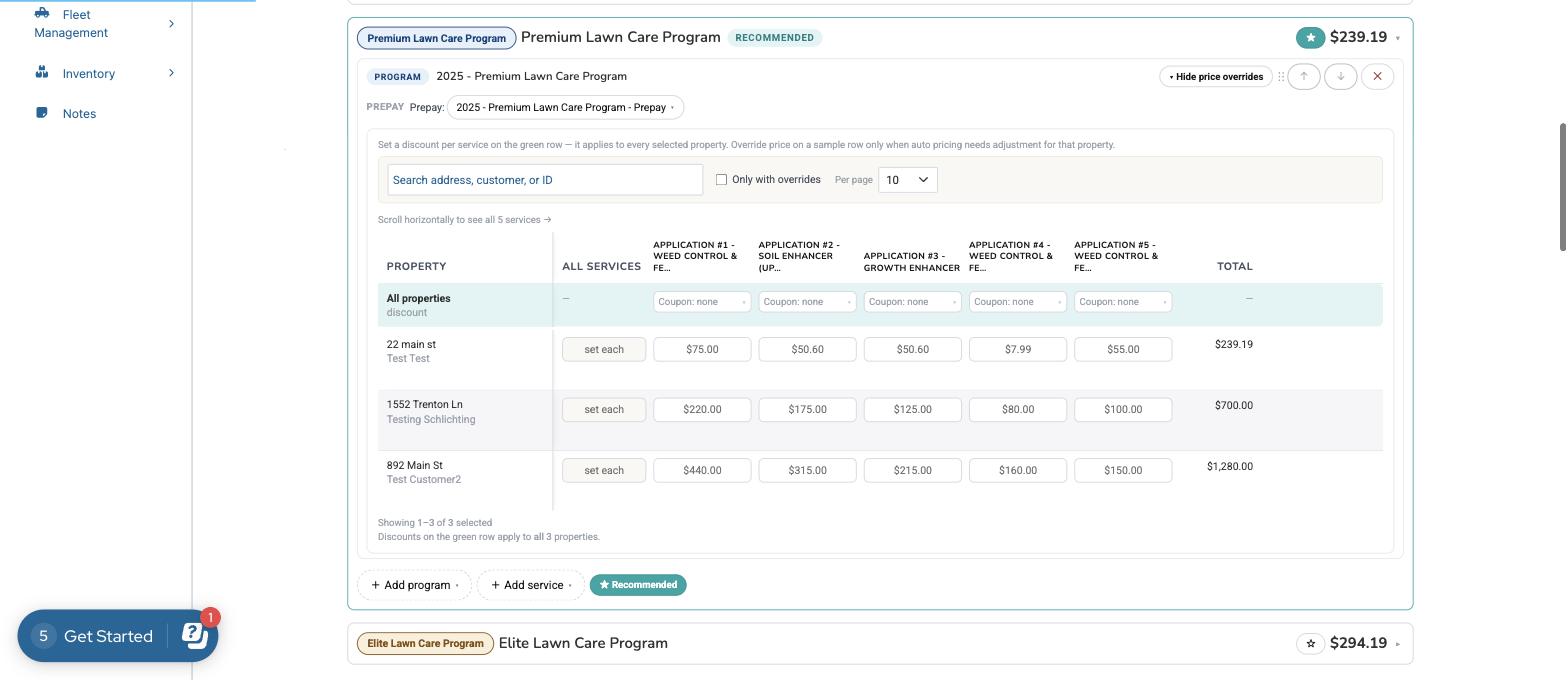
Remember: discounts apply to all properties, while price overrides apply only to the property you enter them on.
3. Review and send
The bulk Review & Send step shows one row per property with its recommended offer, pricing (auto or override), service discounts and total. Summary cards at the top show the number of properties, the combined total, the average estimate and how many properties have price overrides. Click Preview on any row to see exactly what that customer will receive.
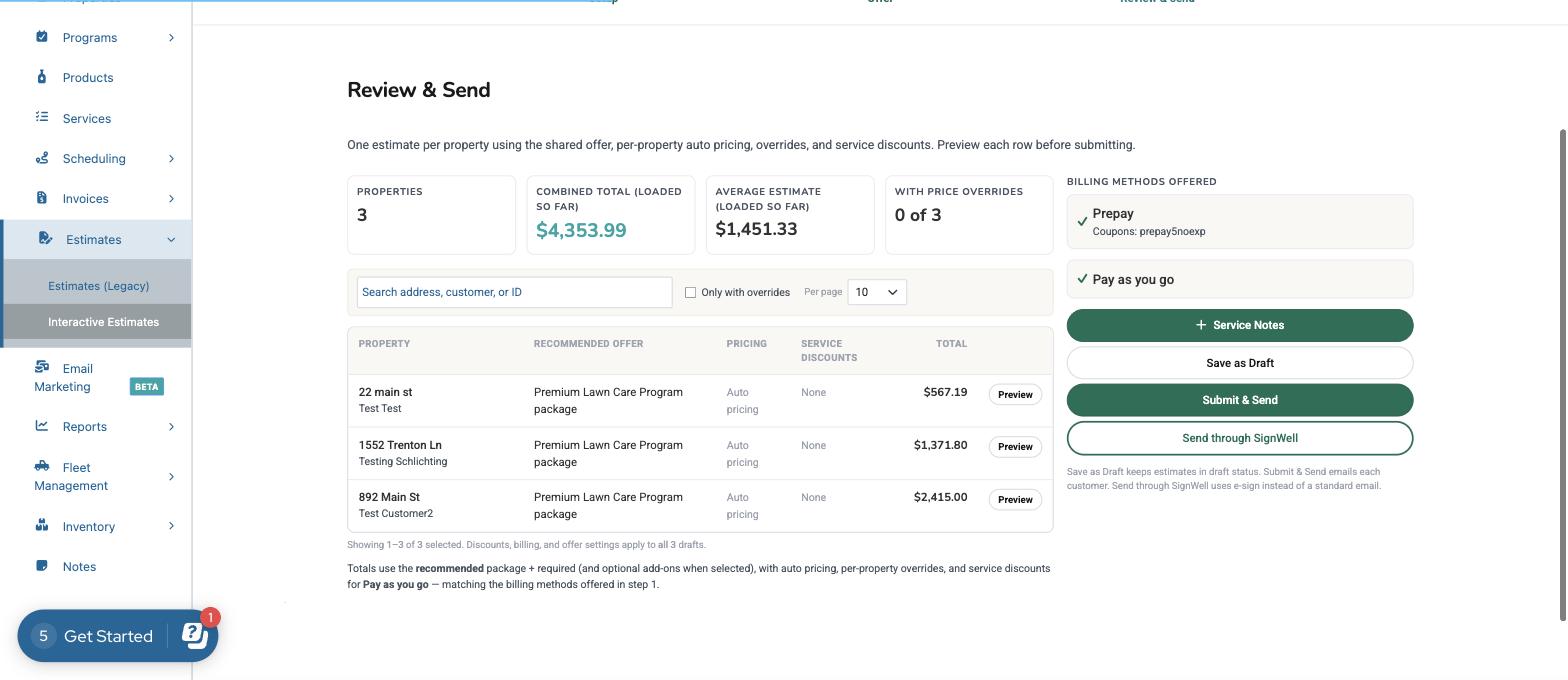
Note: the totals use the recommended package plus required items (and optional add-ons when selected) at Pay As You Go pricing. The combined total and average are calculated from the rows loaded so far.
When you're ready, click Save as Draft, Submit & Send (emails each customer) or Send through SignWell. Because bulk estimates go to many customers at once, we recommend previewing a few properties before you click Submit & Send.
Printing Interactive Estimates
Once your estimate/renewal estimates are created, you can print these estimates:
Single: Print a single interactive estimate by clicking the "Printer" icon next to the estimate you want to print.
Bulk: Select multiple estimates by clicking the checkbox next to the estimate(s) you would like to select. Then click the "Print" button at the top of the page.
Note: There is a limit of printing 50 at a time.
Renewal estimates will print with the "Cover Letter" appended to the beginning of each estimate.
Admin View
As noted earlier, the admin view closely resembles the familiar estimates page you are accustomed to. On this page, you will continue to have the ability to complete the following:
- Filter estimates
- By Status
- Draft
- Sent
- Opened
- Accepted
- By Estimate Type
- Standard
- Renewal (these are estimates that were created during the renewal process)
- By Status
- Edit estimates
- Change status manually
- Individually by clicking the status dropdown next to each estimate
- In bulk by doing the following
- Select all estimates you would like to update status for, then:
- Click "Mark as Sent" to mark those estimates as "Sent" (helpful when printing & sending)
- Click "Bulk Accept" to accept all selected estimates
- Click "Decline
- Select all estimates you would like to update status for, then:
- Send by text/email
- Delete
To preview the estimate that the customer will see, click the "print" icon on the far right in the Action column. You can also "Accept" the estimate from this page if the customer calls in to accept the estimate.
Understanding Interactive Estimate Status Colors
On the Interactive Estimates page, each estimate displays a color-coded status badge to help you quickly track its current stage in the sales lifecycle.
Status Color Reference
| Status | Badge Color | Meaning & Description |
|---|---|---|
| Draft | Grey | The estimate is currently being created or edited and has not yet been sent to the prospect or customer. |
| Sent | Orange | The estimate has been successfully dispatched to the customer via email or text, but they have not opened it yet. |
| Opened | Blue | The customer has opened and viewed the interactive estimate link. |
| Accepted | Green | The customer has formally accepted the estimate and agreed to the quoted services. |
| Declined | Red | The customer has reviewed and declined the estimate. |
Quick Tip
Use these color indicators to prioritize your follow-ups:
- Orange (Sent): Re-send or follow up with leads who haven't opened their estimate yet.
- Blue (Opened): Touch base with customers actively reviewing their proposal to answer questions and close the sale.
How to Send an Estimate
- Navigate to Estimates > Interactive Estimates in the left menu.
- Locate the estimate(s) you wish to send and check the selection box next to it.
- Click the Send by text/email button to open the email message modal.
Customizing the Email Message
When the send modal opens, you can preview the exact email template your customer will receive, which includes your company logo and a direct link to view their estimate.
- Personalized Greeting: The system automatically populates the
Hi [Customer Name],greeting dynamically. - Custom Message Area: The custom message box acts as a cover letter for your estimate proposal. You can use this space to:
- Pitch & Highlight Value: Detail specific benefits of the recommended service program (e.g., explaining why a multi-step lawn program is ideal for their property).
- Outline Special Promotions: Include limited-time discounts, payment plan options, or seasonal incentives.
- Set Clear Next Steps: Direct the customer on what to do next (e.g., "Click the blue button below to review the program options and accept your quote online").
- Text Formatting Toolbar: Format your message body using standard rich-text tools:
- Text Styling: Bold (B), Underline (U), or Strikethrough.
- Font Family & Color: Change text fonts or apply custom highlight colors.
- Media & Links: Insert hyperlinks, images, or video links directly into the body text.
Finalizing & Sending
- Customer View: Your client will receive the email with a call-to-action "View Your Estimate" button that opens their interactive quote online.
- Send: Click the green Send button at the bottom to dispatch the email.
- Cancel: Click Cancel to exit without sending.
Customer View
When the estimate arrives in your customer's inbox, it will look like this (with your company logo and information)
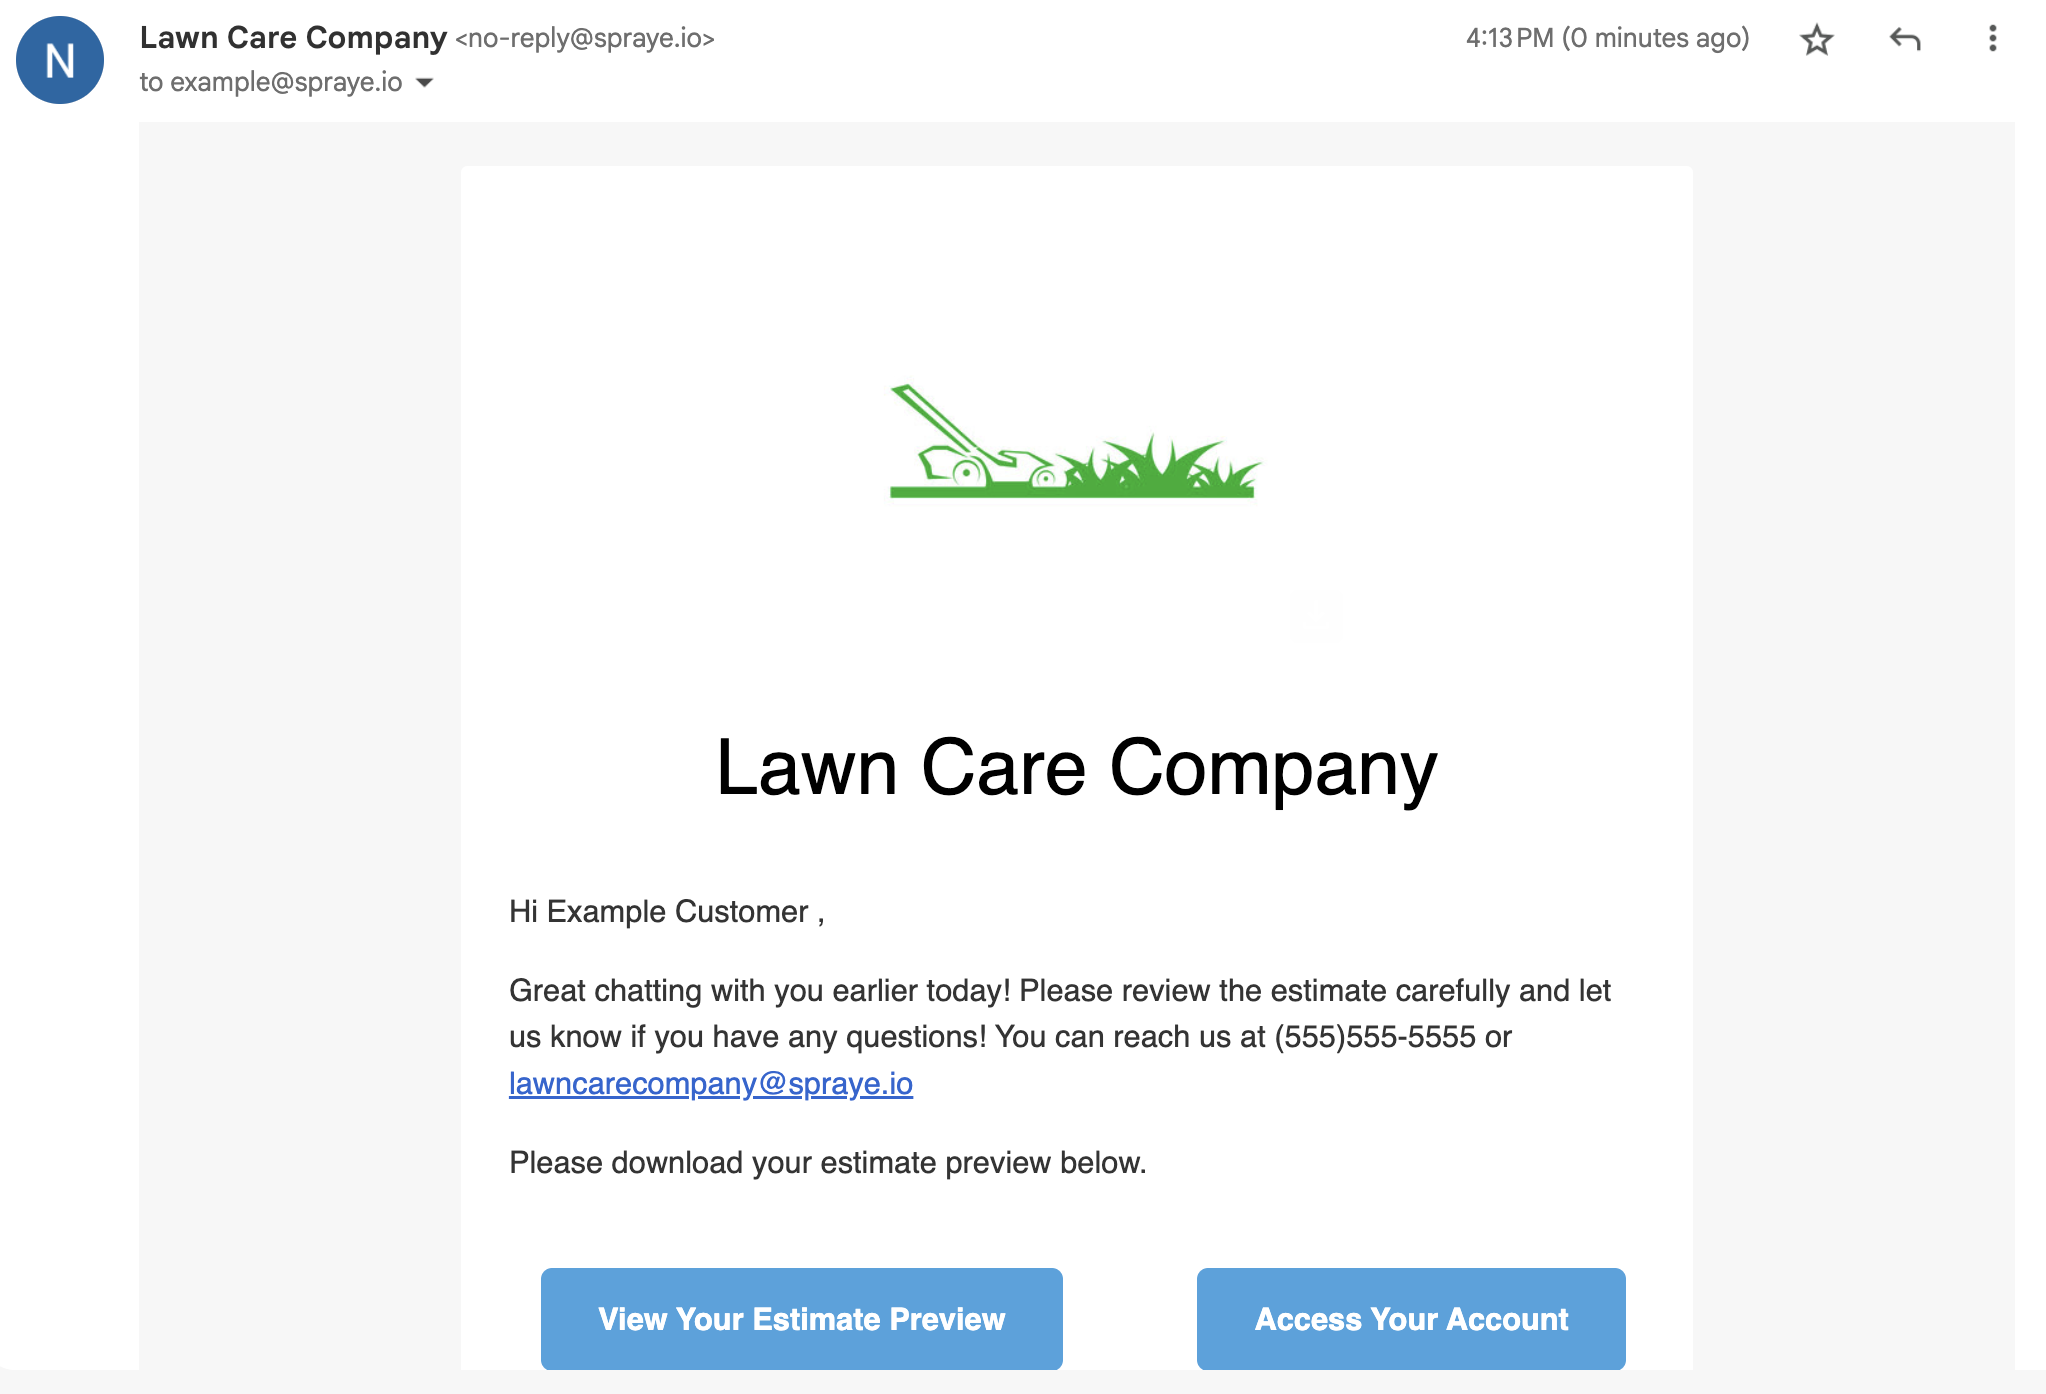
They can View Your Estimate Preview (which opens the interactive estimate page), or Access Your Account (which takes the to the customer portal login page)
When they click to open the preview, they can do the following:
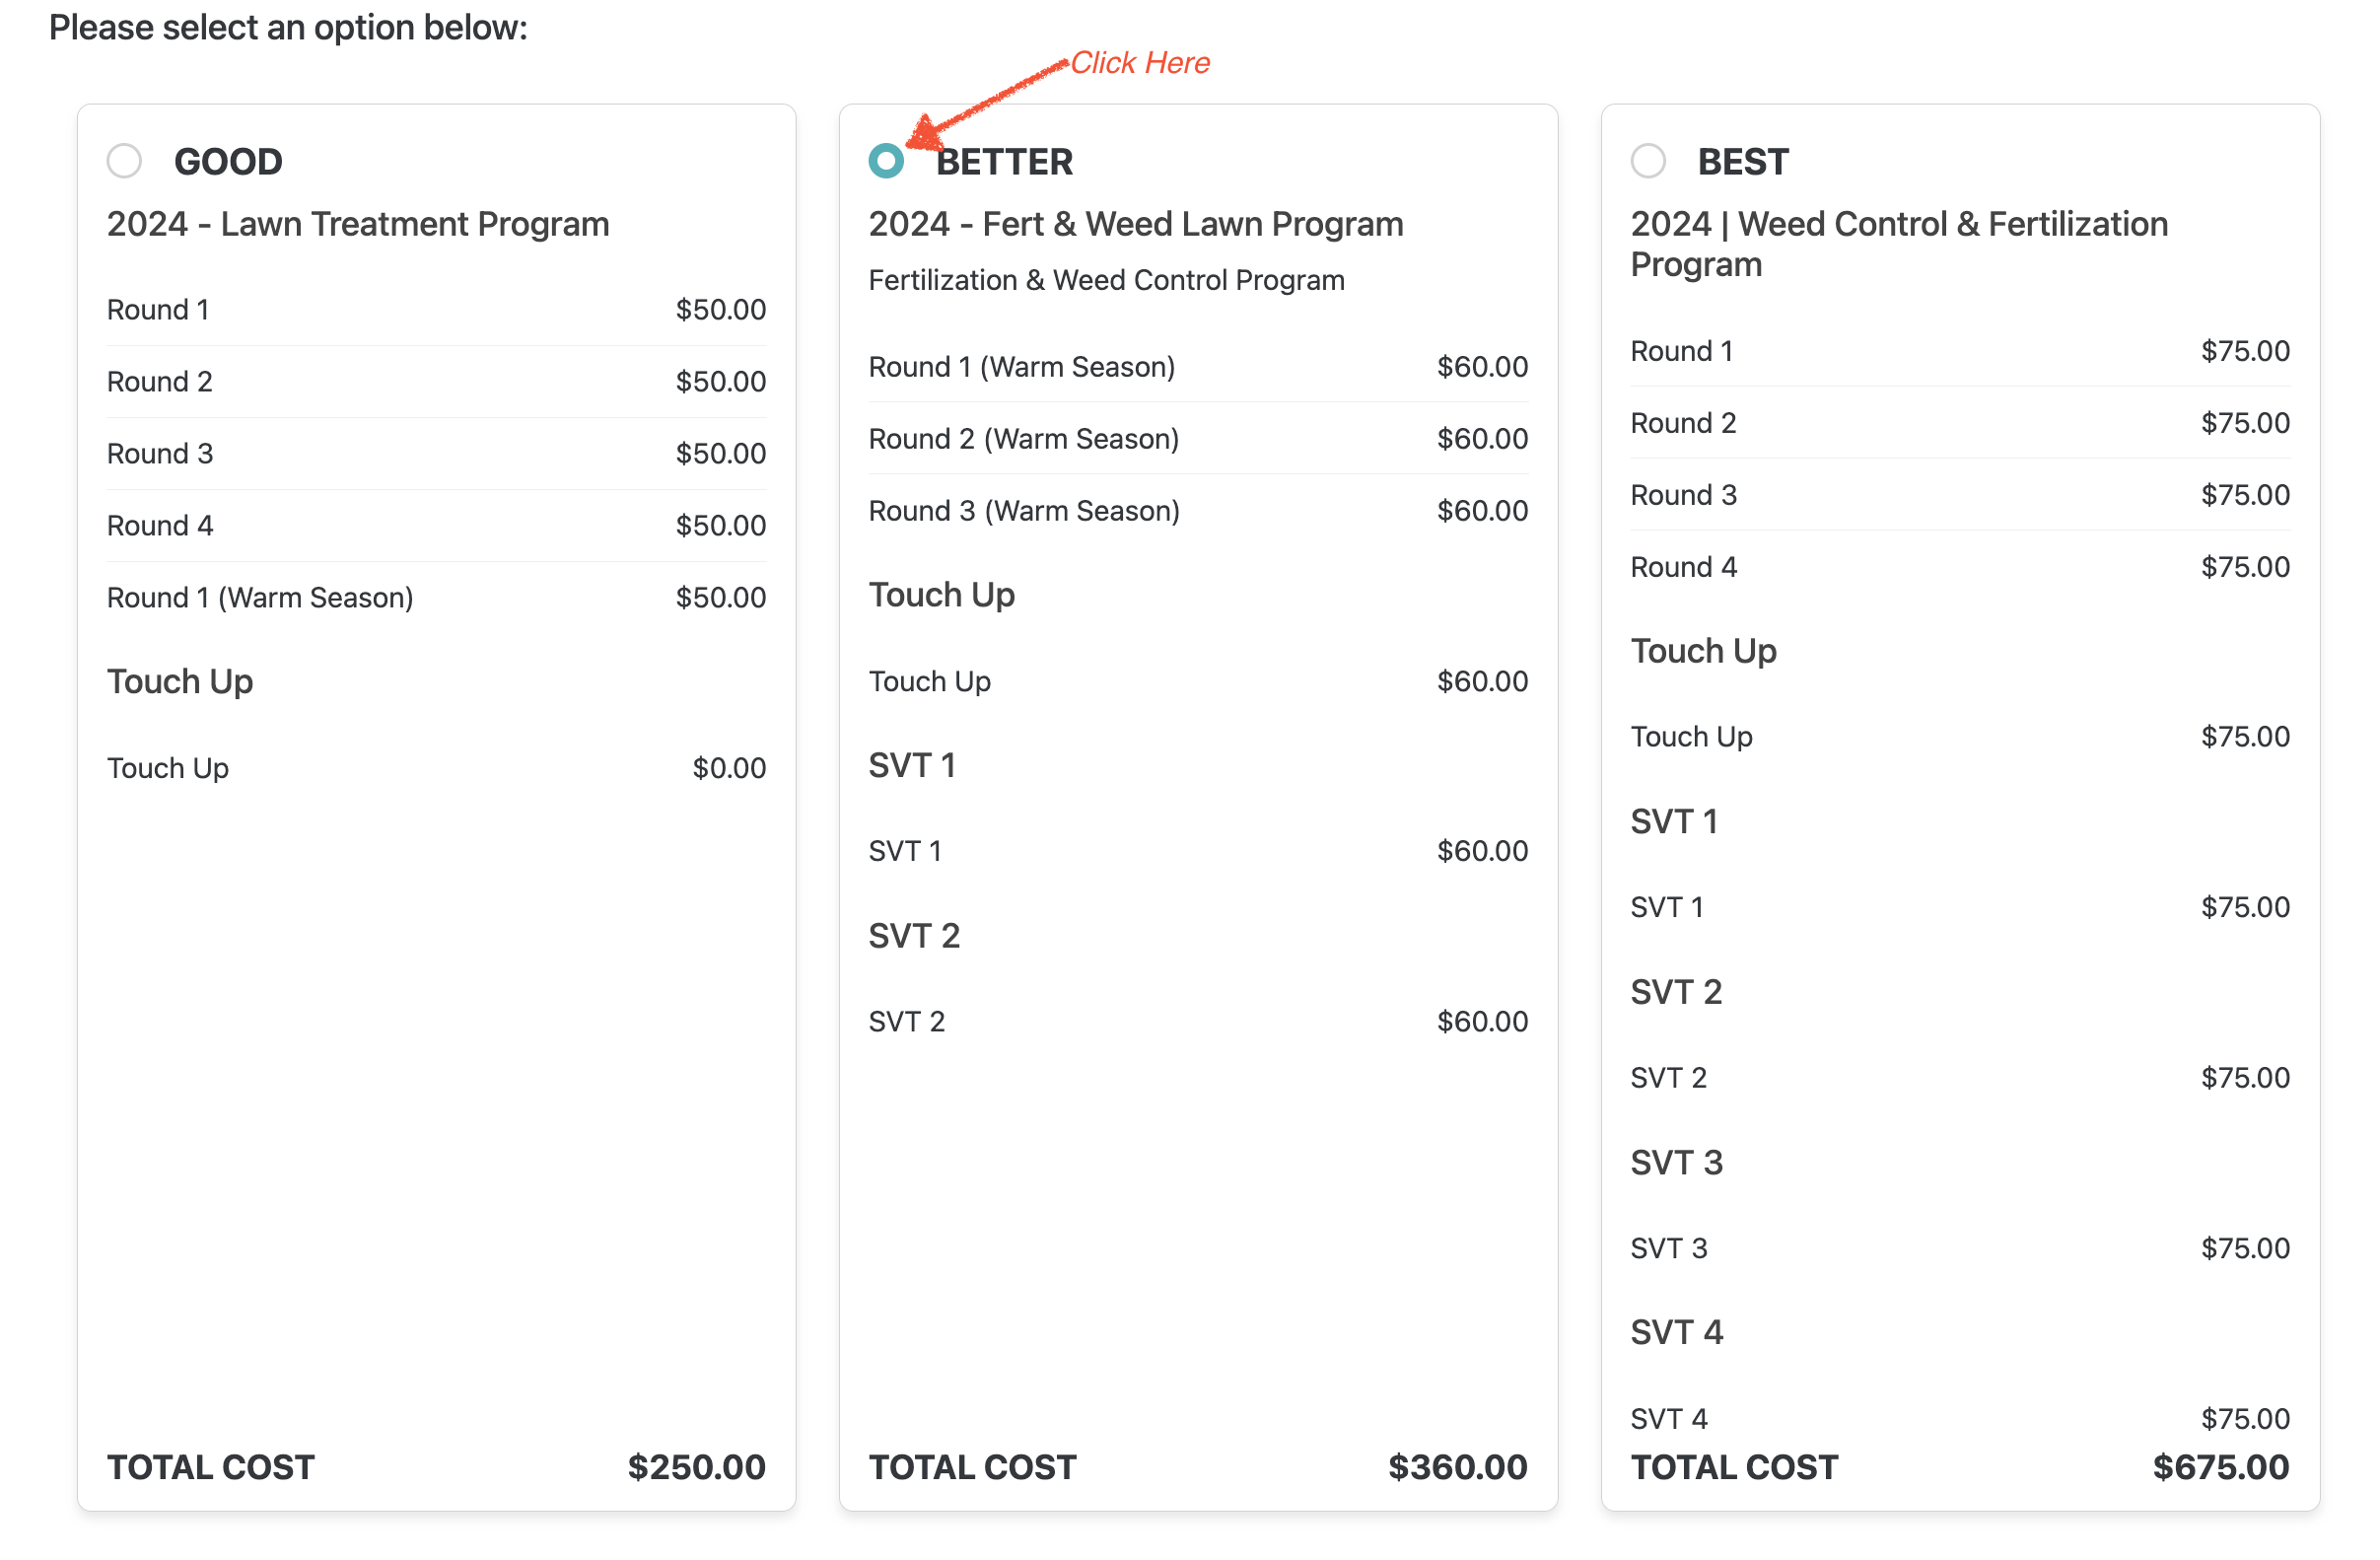
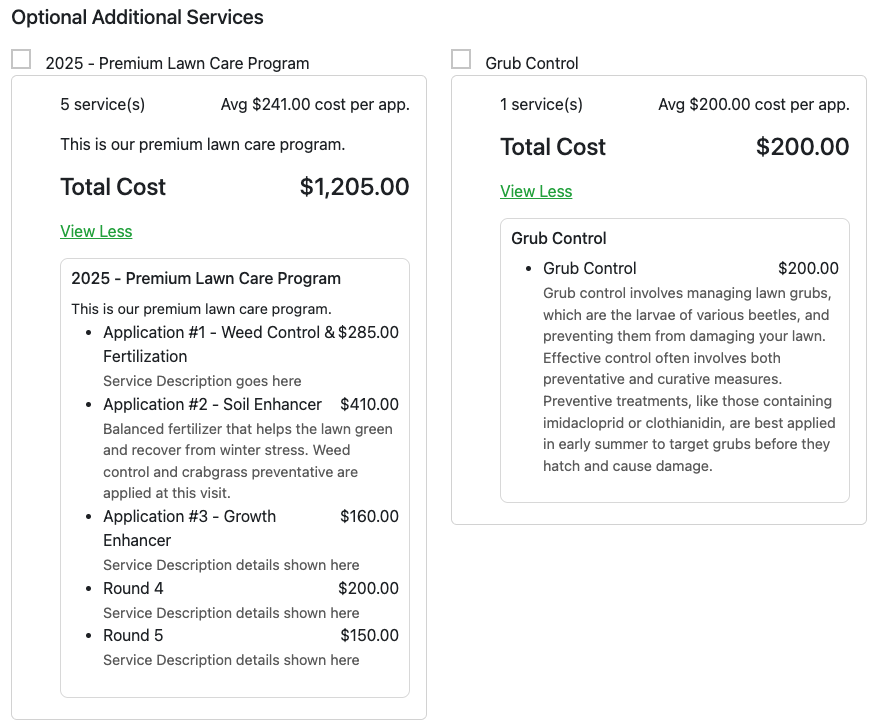
Check the boxes to select the desired packages, programs, or services
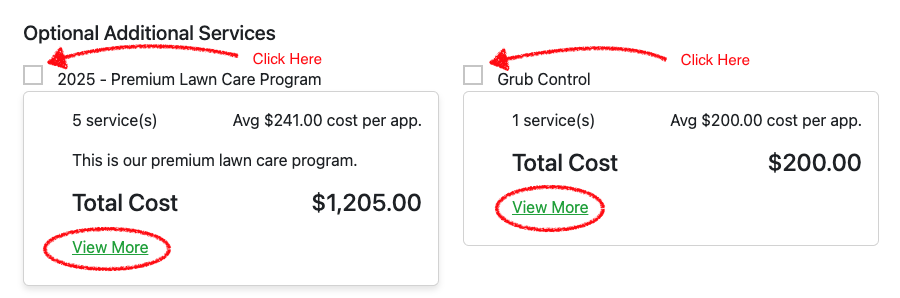
- The Optional Additional Services section will show a "View More" link that you can click to see more information. Programs will show each service in the program, a description of each service and the pricing for each service. Services will show a description of the service.
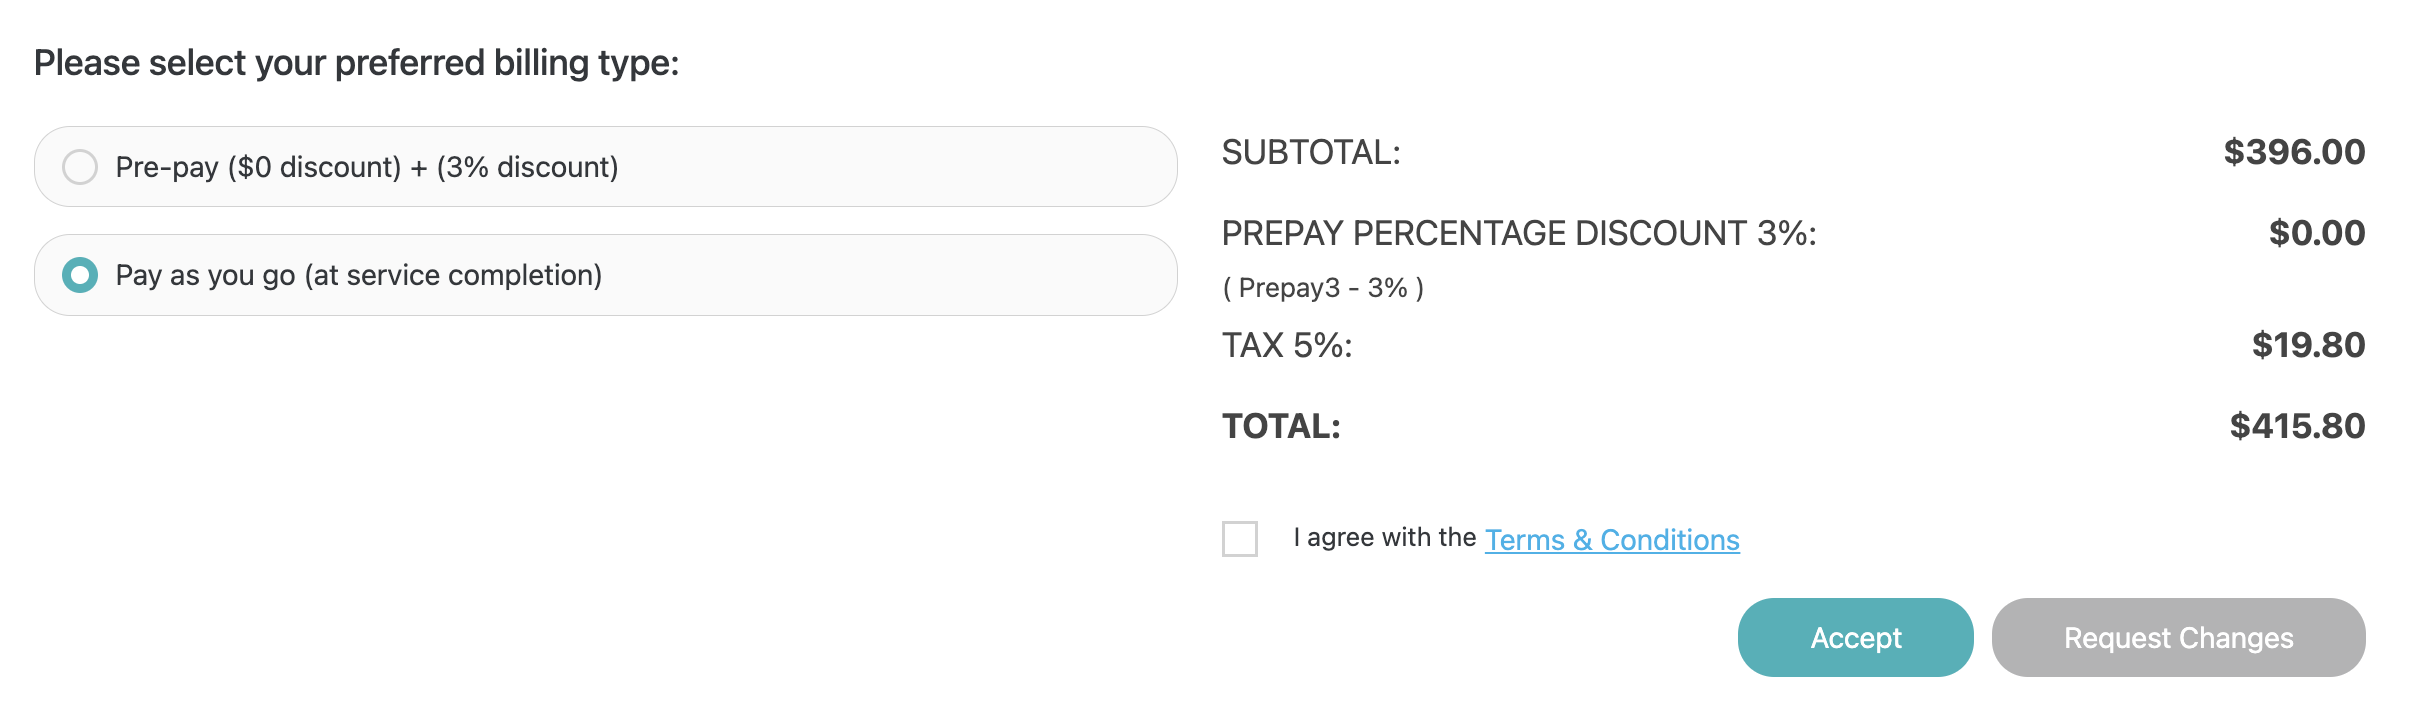
Lastly, they will select their preferred billing type, accept terms & conditions, and Accept or Request Changes
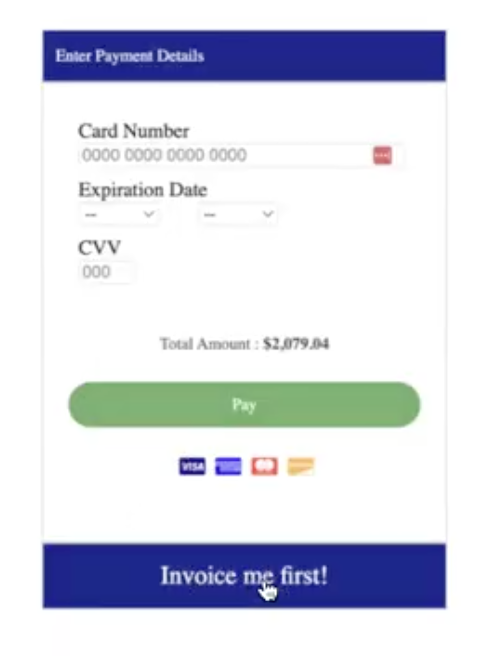
Pre-pay: Directs customers to pay using their card (if Fiserv is setup), or they can choose to Invoice me first! (this will send the invoice to them via email instead)
Pay as you go: Invoice is generated at job completion and you can send them out the same way you have been
Accept: Assigns the customer to the program automatically. Now, you're ready to schedule!
Request Changes: If the customer send a request to change the estimate. This will be sent directly to your company email (the one listed in the company details section of your global settings).
NOTE: If your customer (or you) are seeing an error when accepting an estimate, it is likely because of one of 2 reasons (or both):
1. The property is already assigned to a program on the estimate. To fix this, navigate to the property page and go to the "Assign Program(s)" dropdown, remove the program and click save.
2. The property already has an accepted "Legacy" estimate for that program. To fix this, you can delete that accepted legacy estimate.
View a sample estimate -->
Explore More:
- Automated estimate and invoice follow-up emails --> Click here to learn how to setup automated email and/or text message follow-ups for pending estimates
- Send interactive estimates to customers via text message (this option is available if you have text enabled for your account)
- Interactive Estimate Templates --> Click here to learn more about how to use templates to save time when creating new estimates.
Legacy: Creating an Estimate with the Previous Builder
Note: If your account doesn't have the new Interactive Estimate Builder yet, clicking + New Interactive Estimate opens the previous step-by-step form (with a Prepay Optional toggle). Use the steps below instead. This section will be removed once the new builder is available to all accounts.
Accessing the Interactive Estimate Screen
Under the Estimates menu on the left, choose the new "Interactive Estimates" option, or click here
This will load the interactive estimate screen.
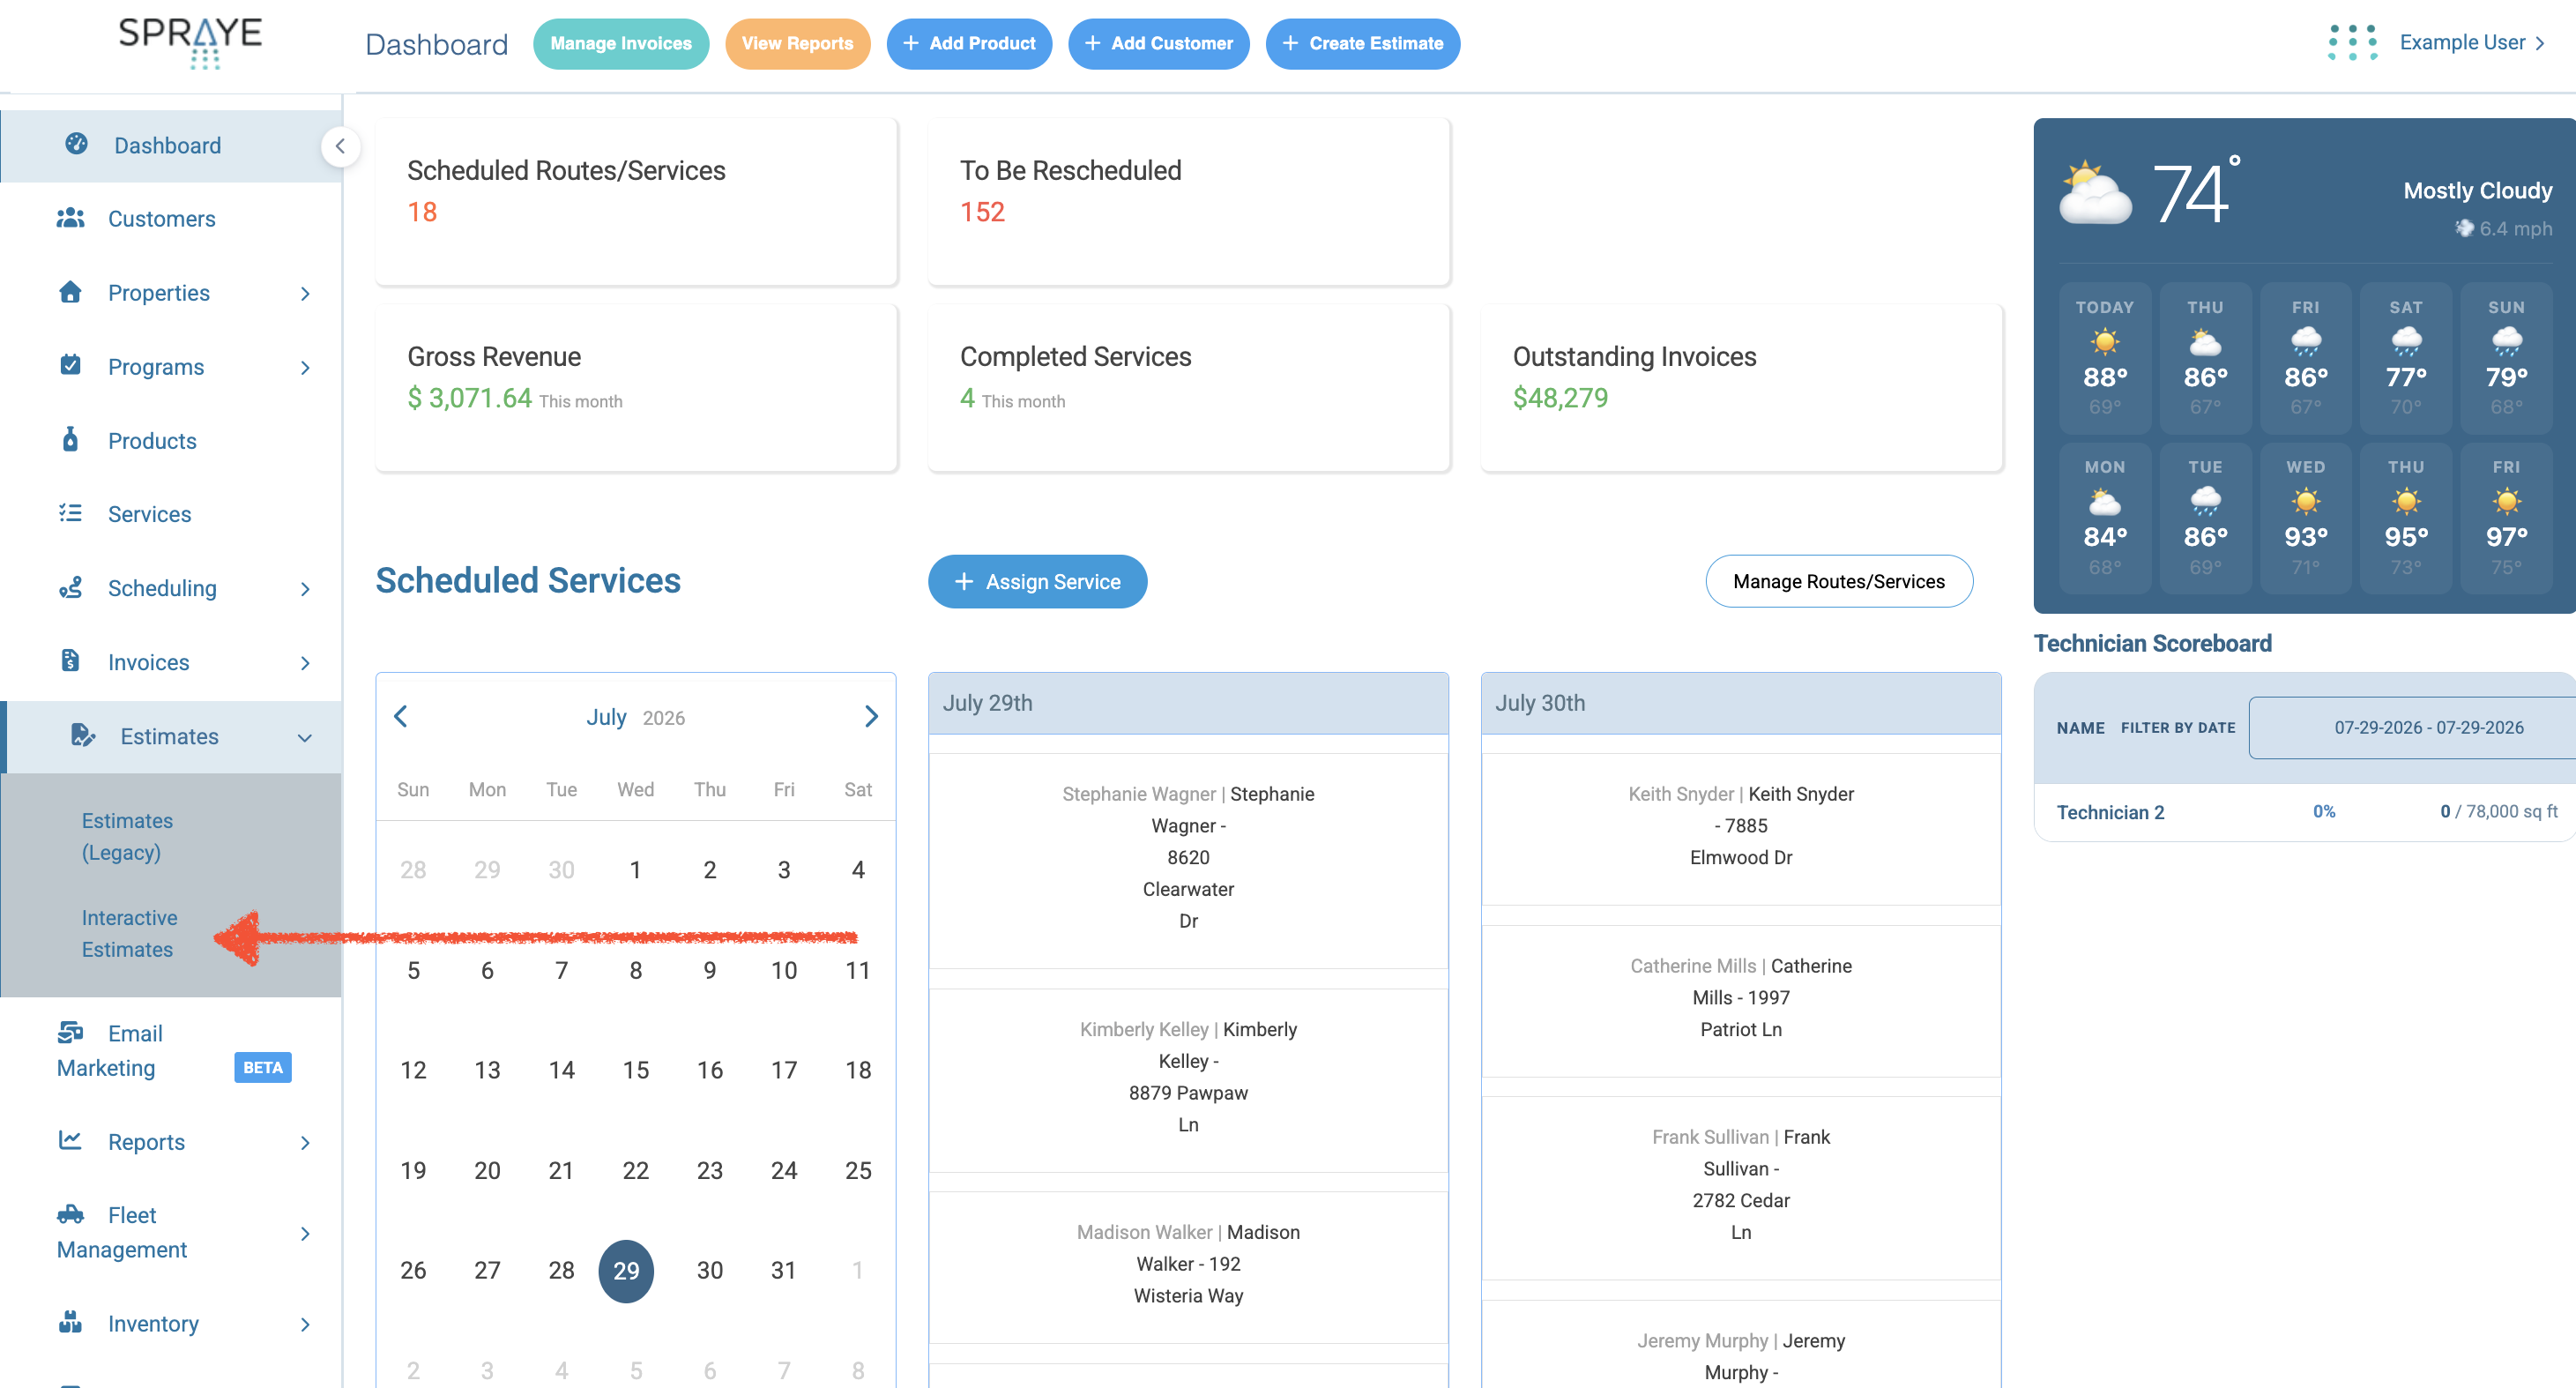
Creating a New Estimate
Click + New Interactive Estimate at the top of the screen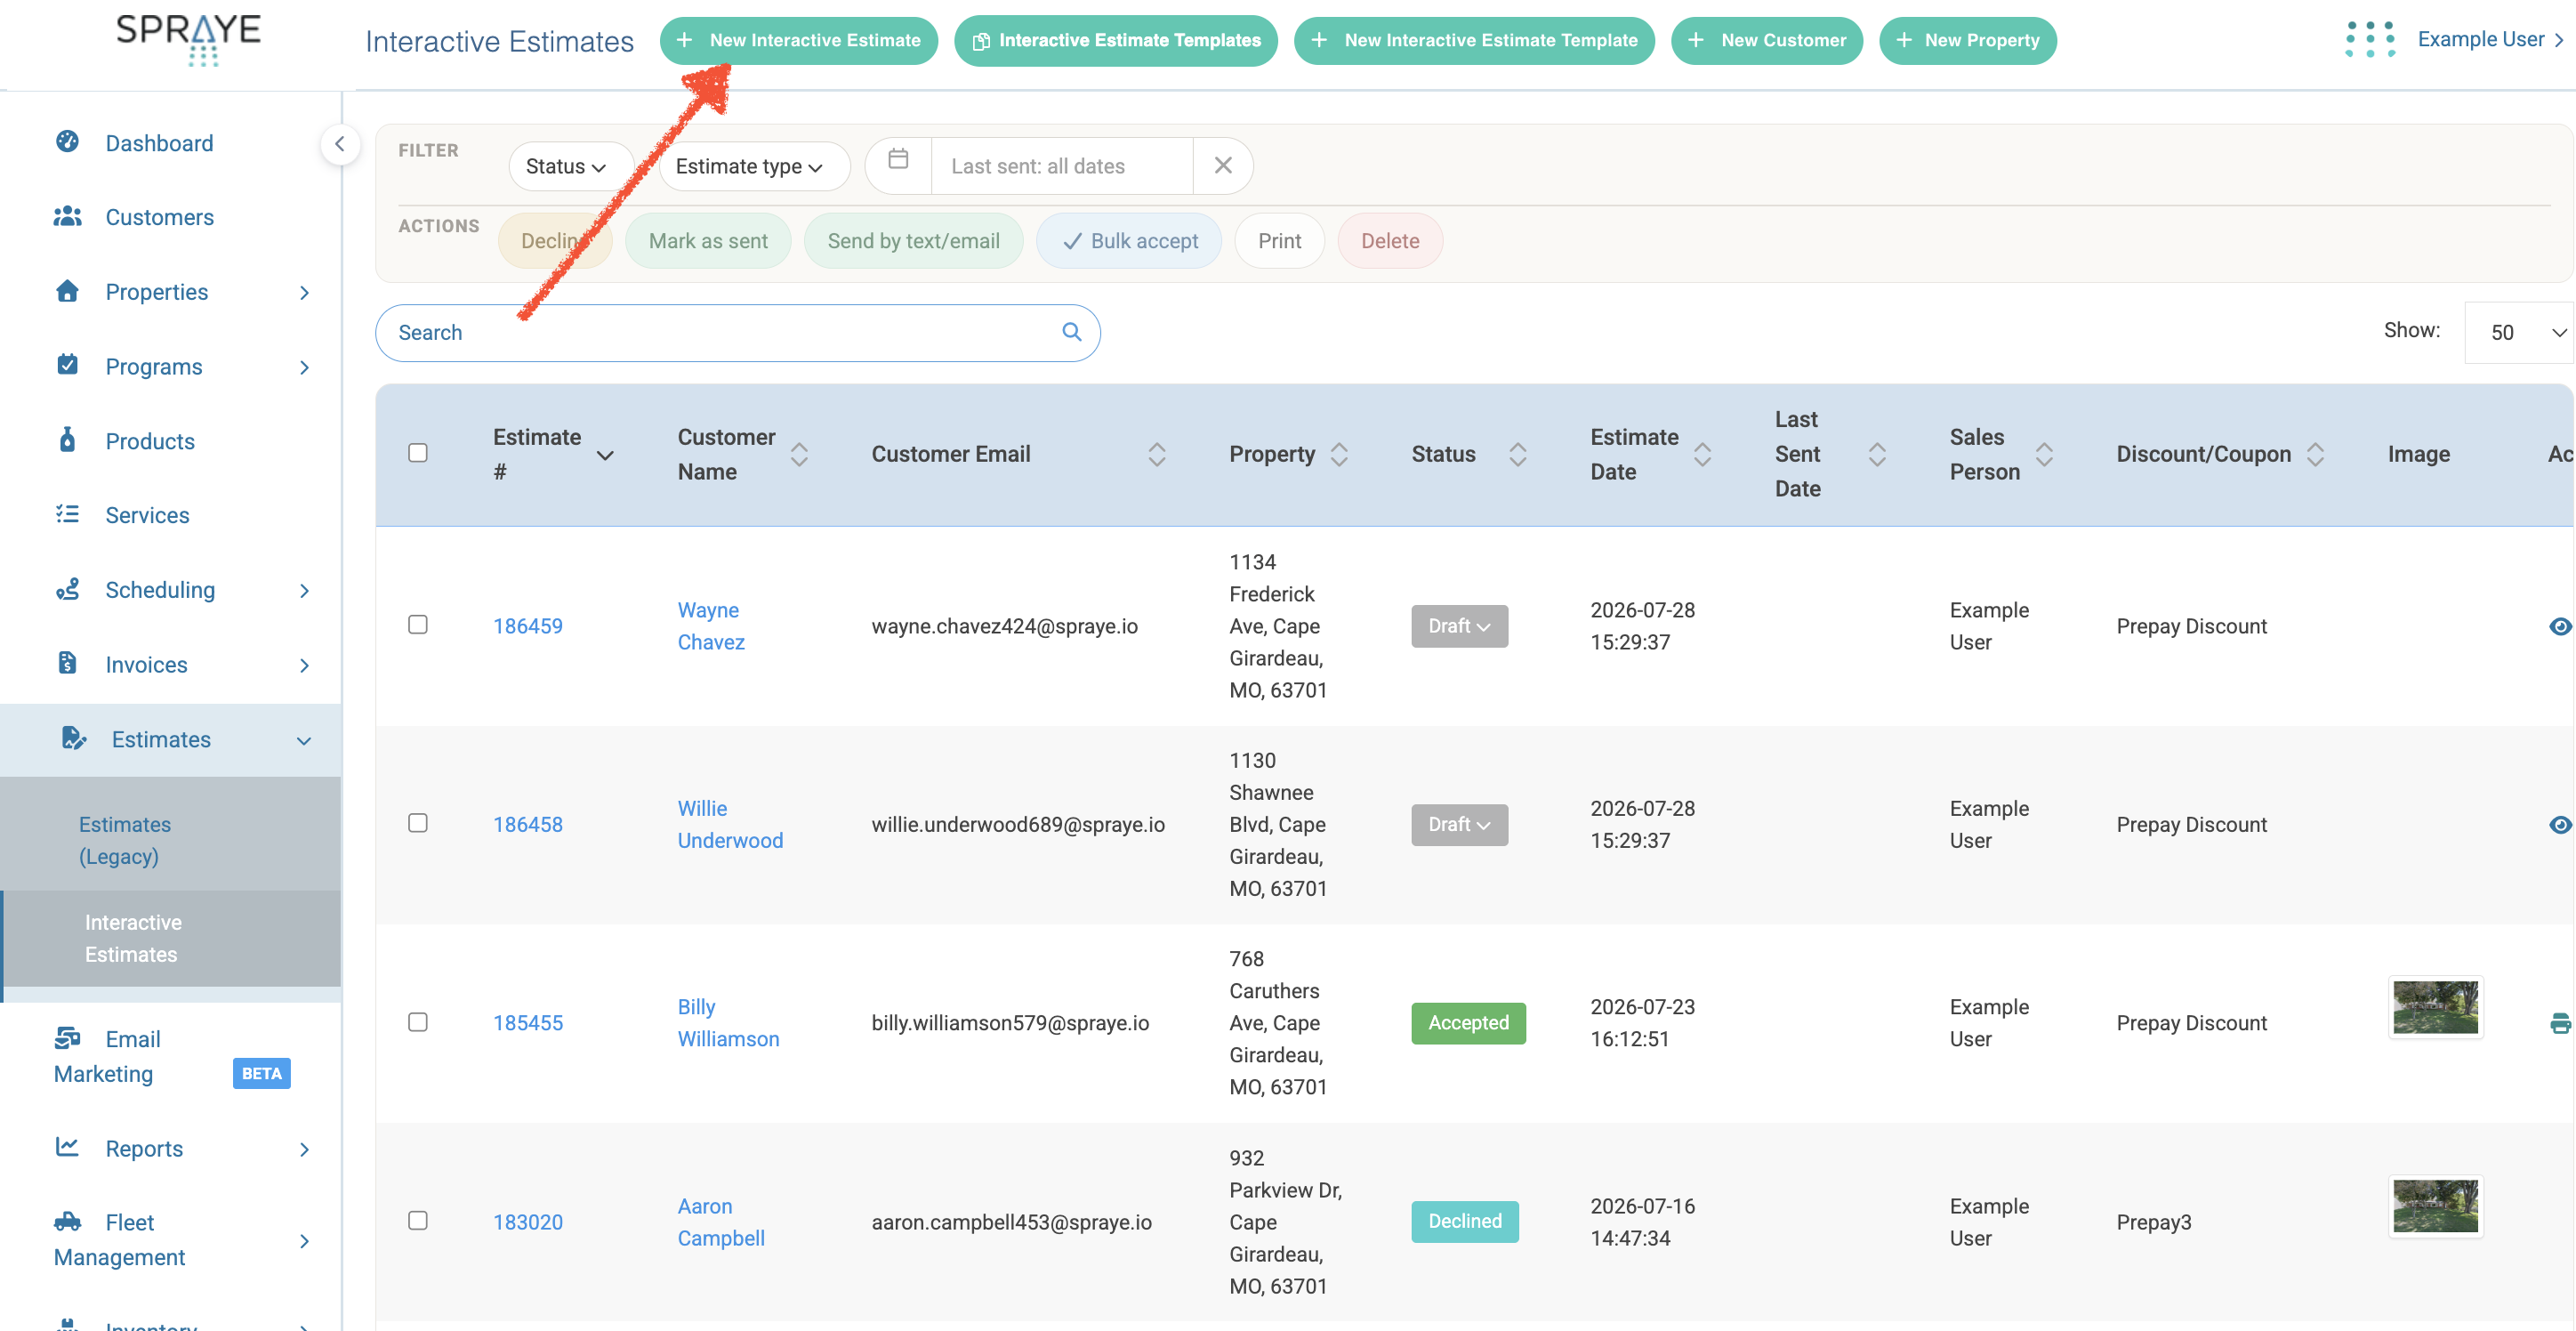
Select Properties/Discounts
Toggle ON "Prepay Optional" if you'd like to give your customer(s) the option to either prepay or not prepay when accepting the estimate. If you want to only offer prepay OR pay as you go, then keep this toggle "OFF".
Note If you toggle this option ON, you will see that an additional step is added to this process and the will have an option to add a prepay-specific coupon. You will also need to have 2 separate programs created already for your customers to have the option to choose between either a "Prepay" (One-Time Project Invoicing) program or a "Pay as you go" (Invoiced at Job Completion) program.
Add your coupons.
Note There is a difference between the estimate coupon and the prepay coupon
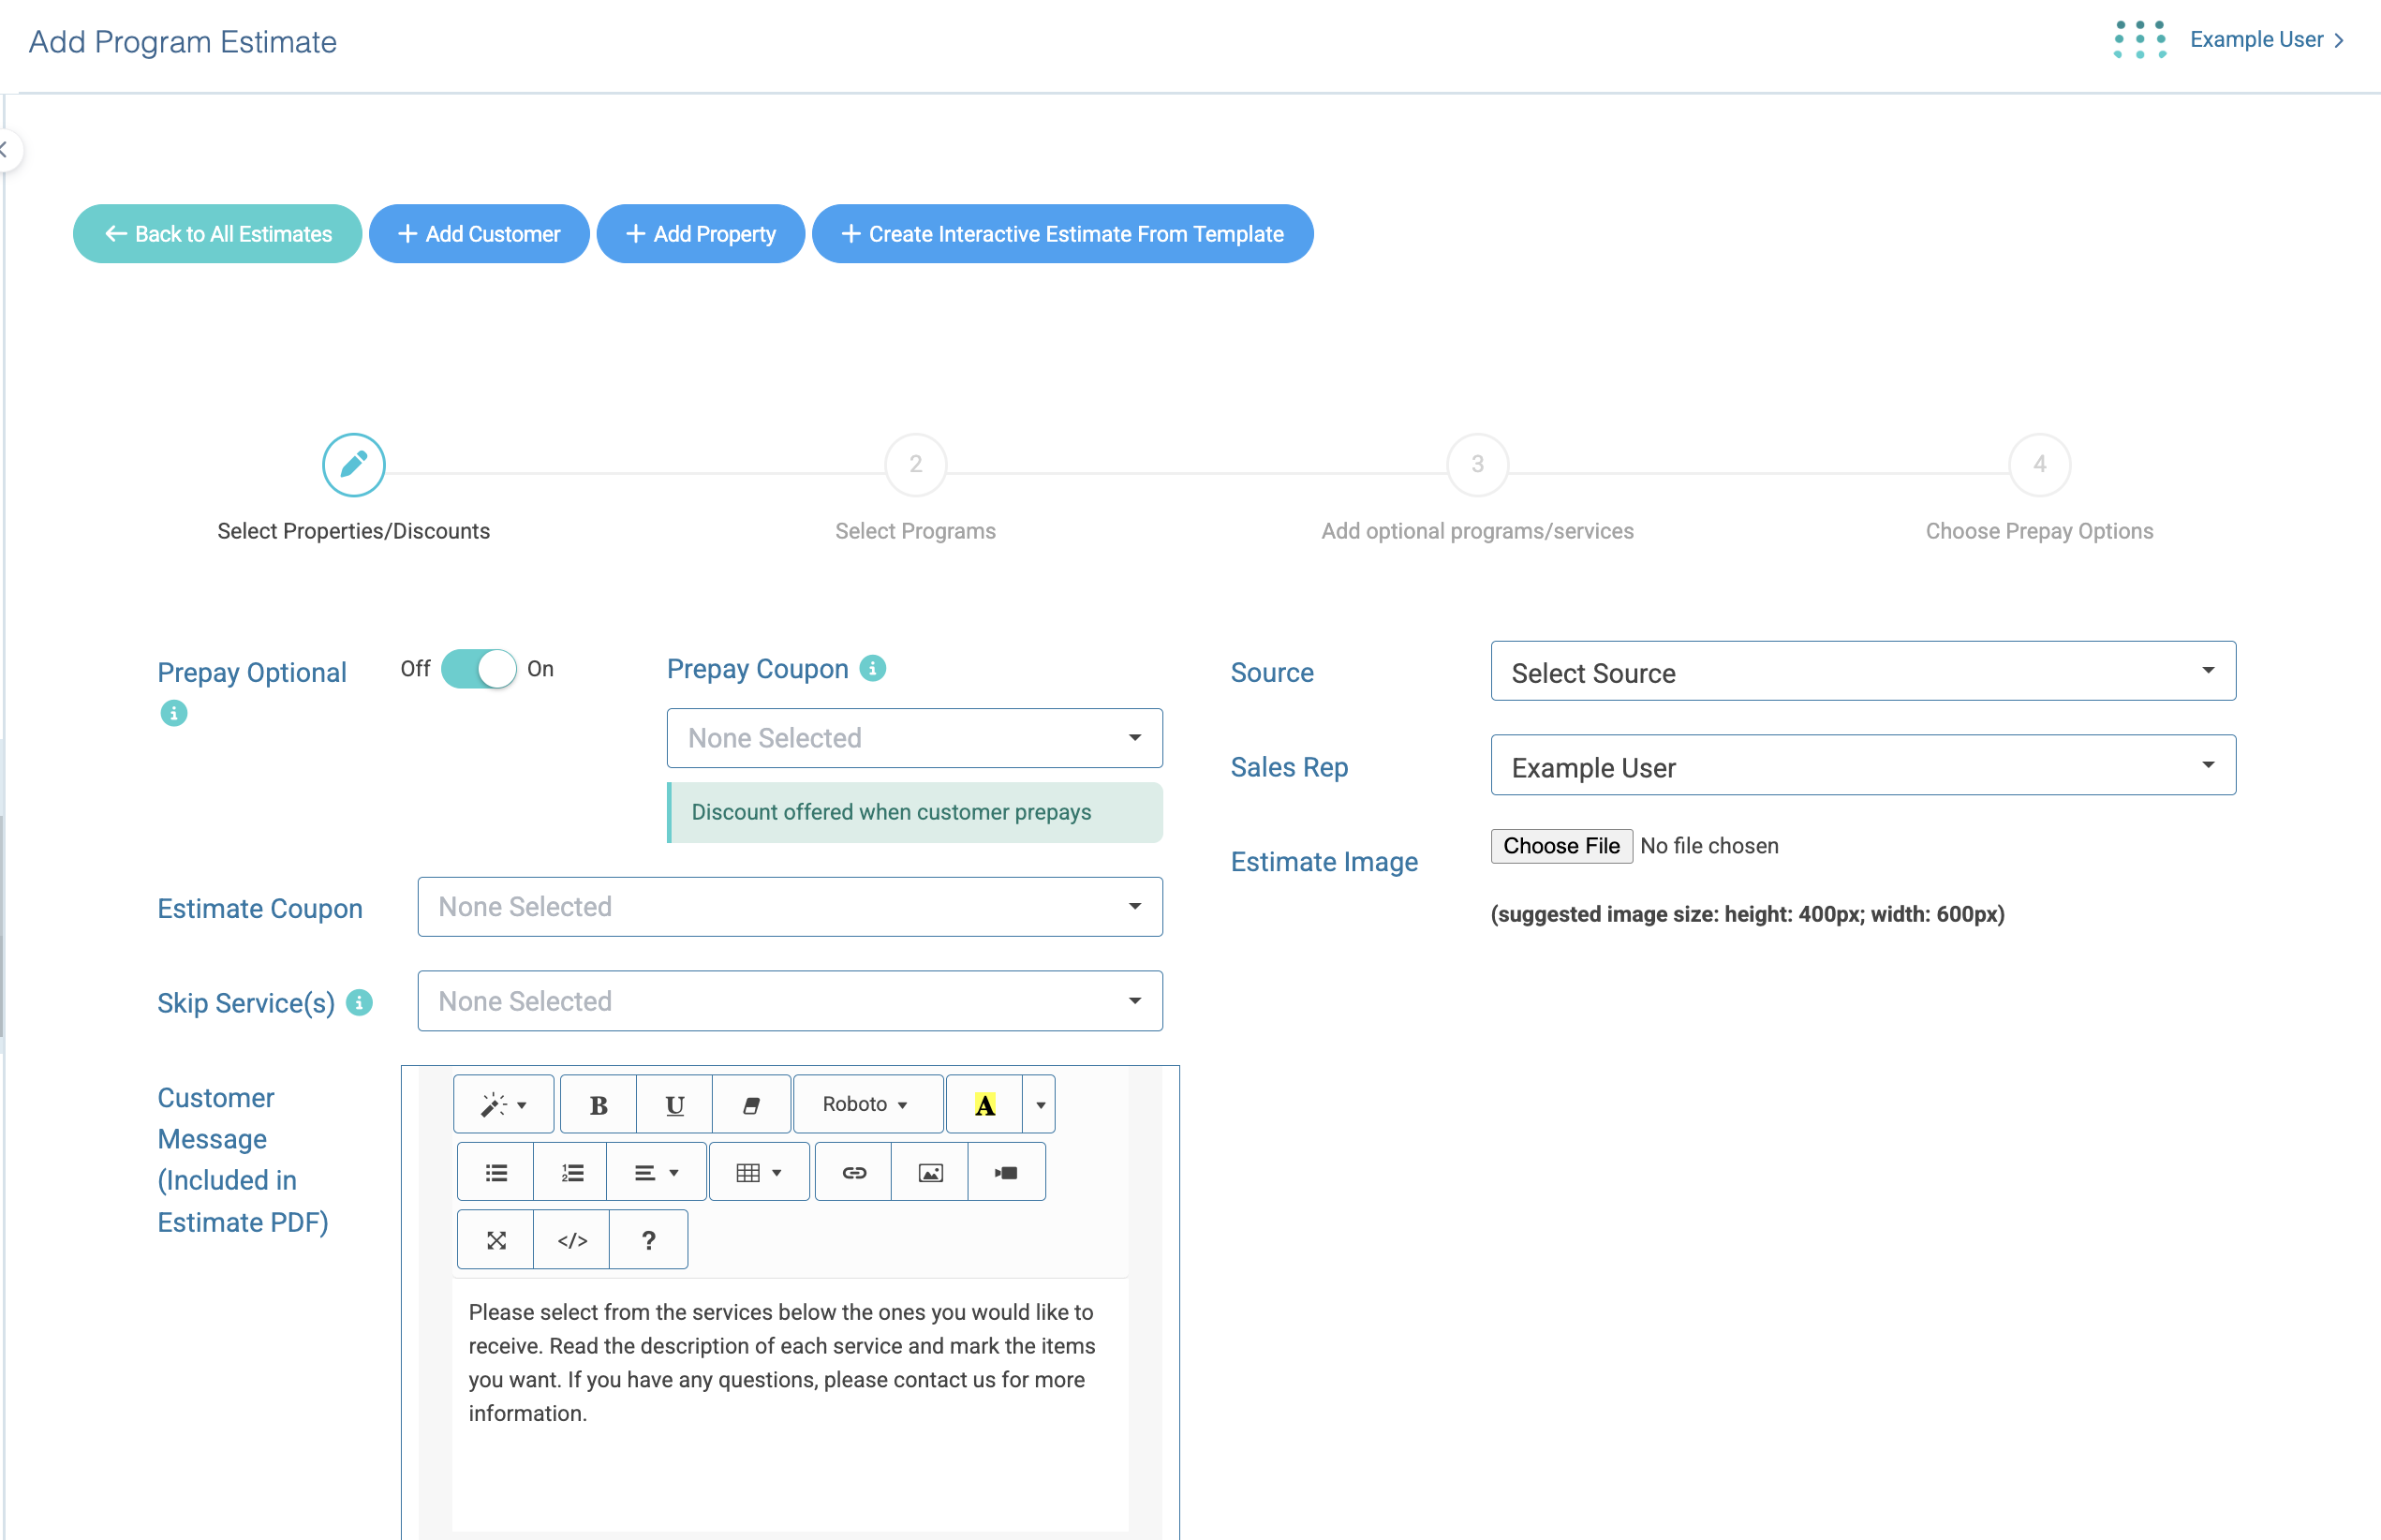
Track Source or Sales Rep (optional)
Write a Customer Message and/or Upload an Estimate Image
Search for your customer.
Use the blue "filters" button to filter for a group of customers.
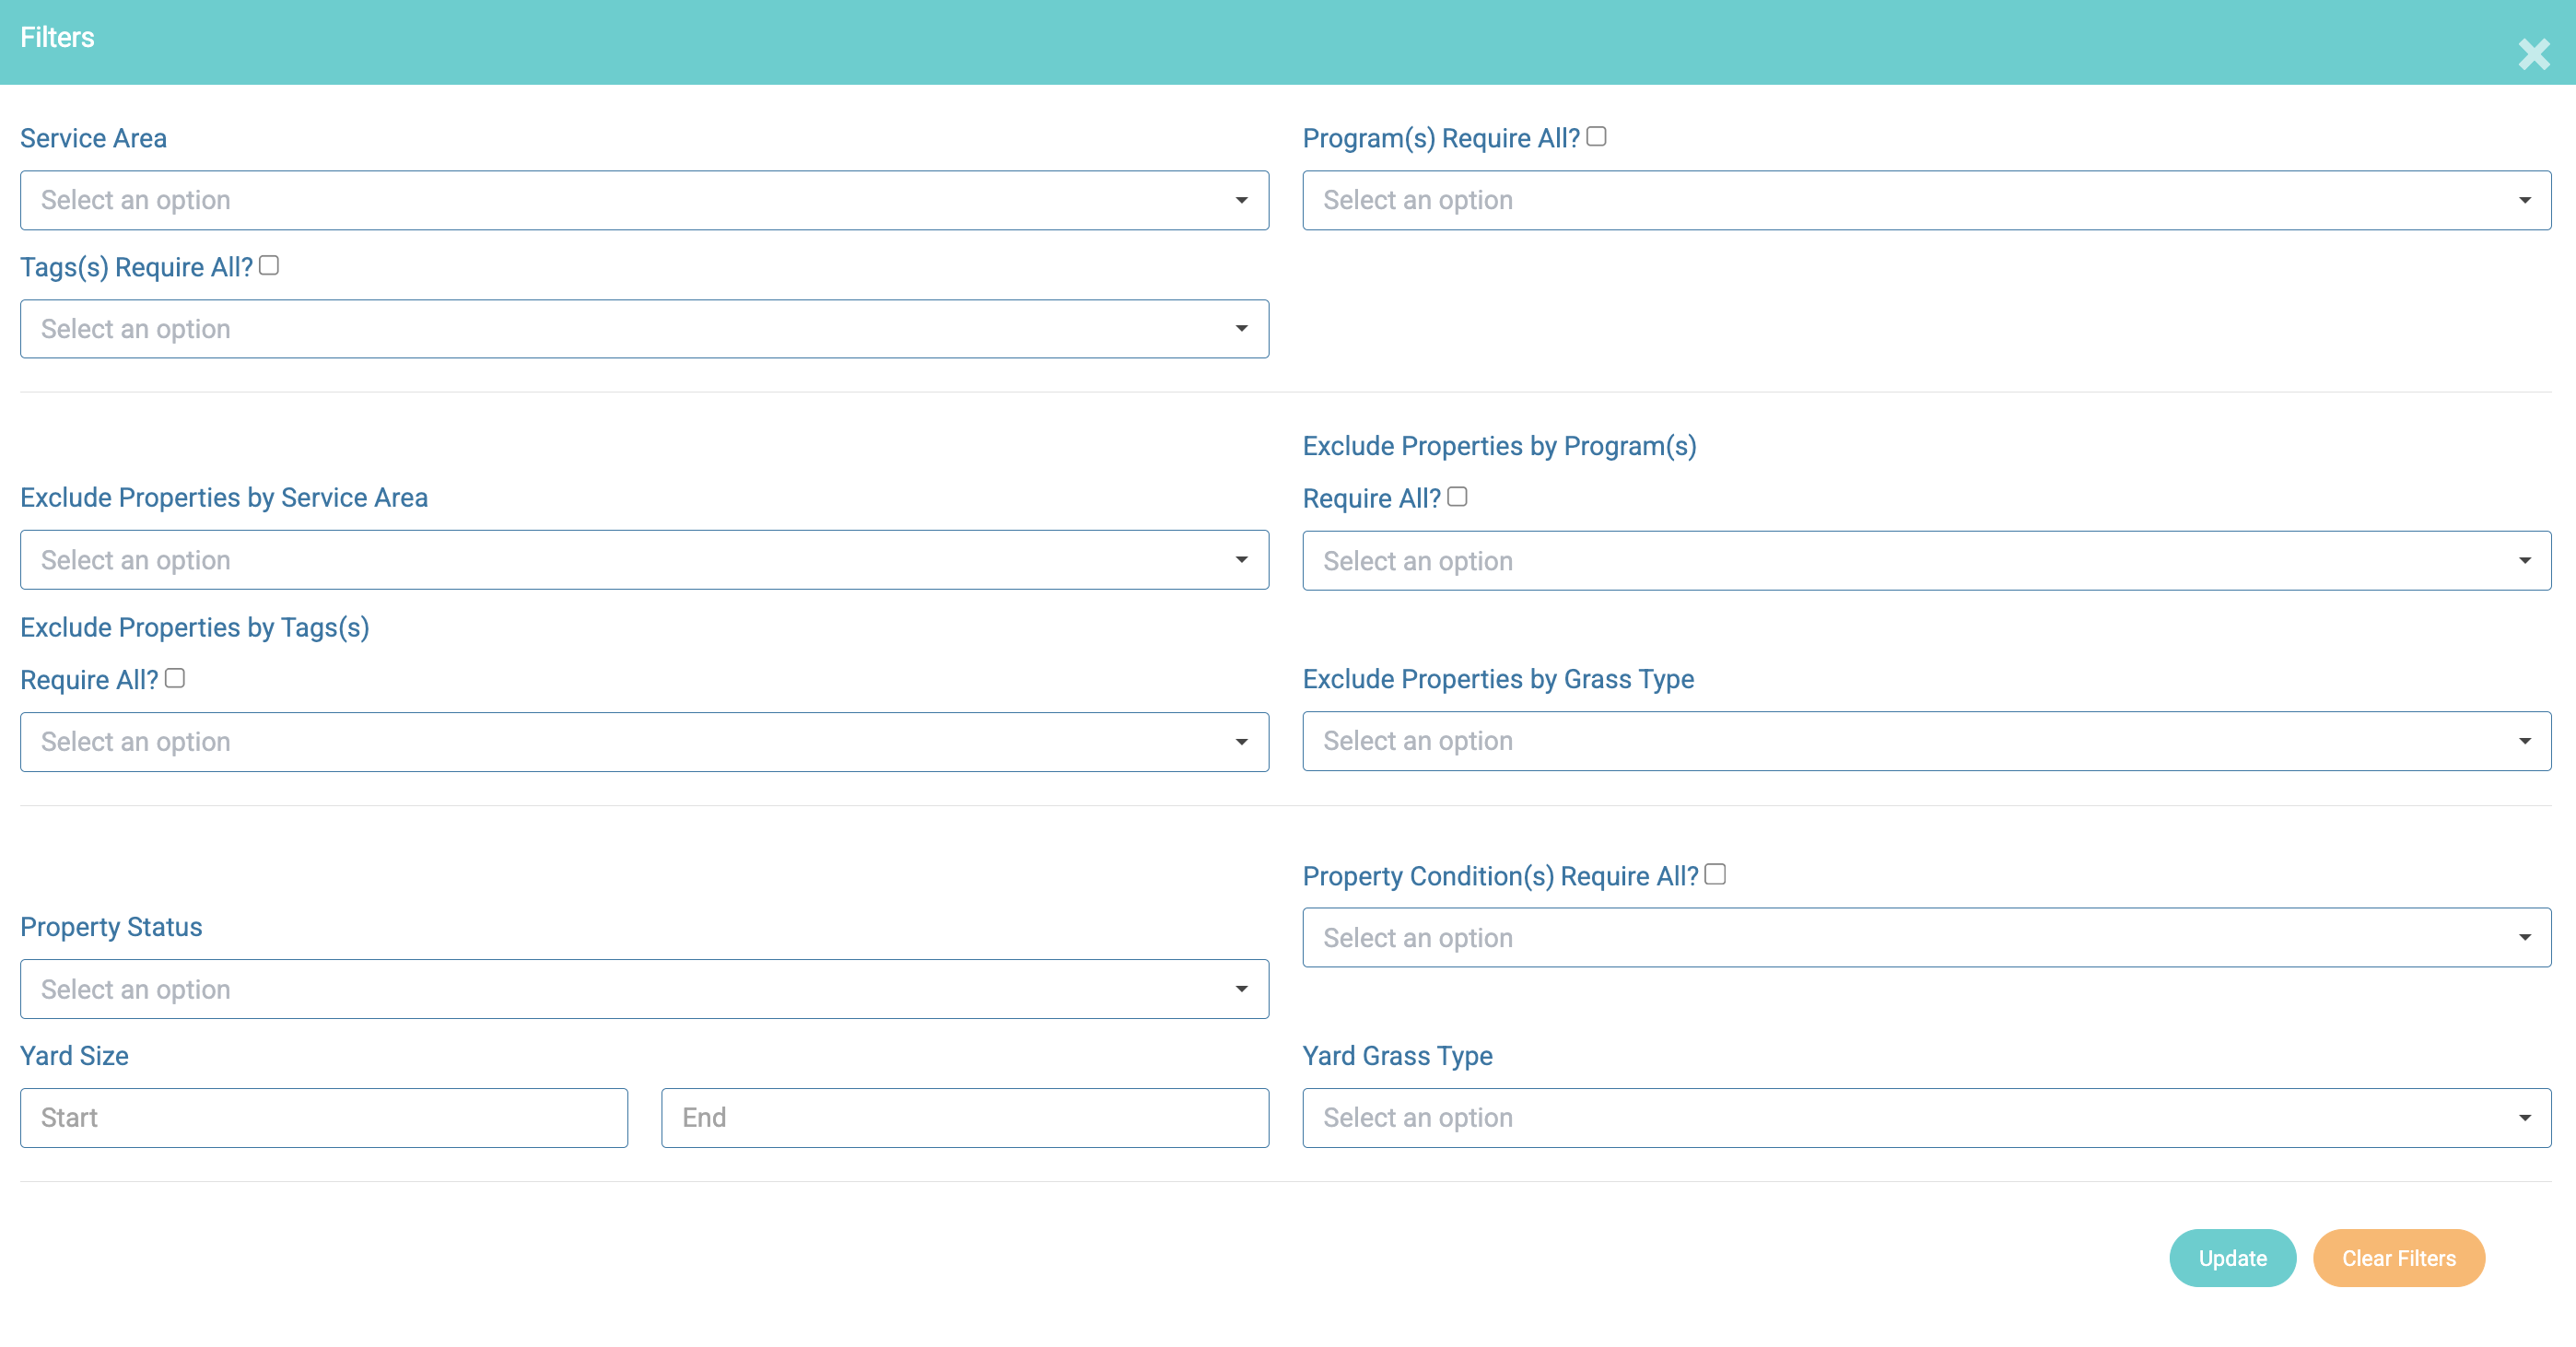
Check the box to the left of the property name to select it.
If needed, check the price override box on the far right for any customer you want to add price overrides for in the event that you will not be using automatic system pricing.
Select Programs
- When Prepay Optional is selected, there is no need to choose “Pricing". You will be able to enter your prepay programs at the end of this process.
If you'd like to choose package options (e.g., "Good/Best"), select in the dropdown menu
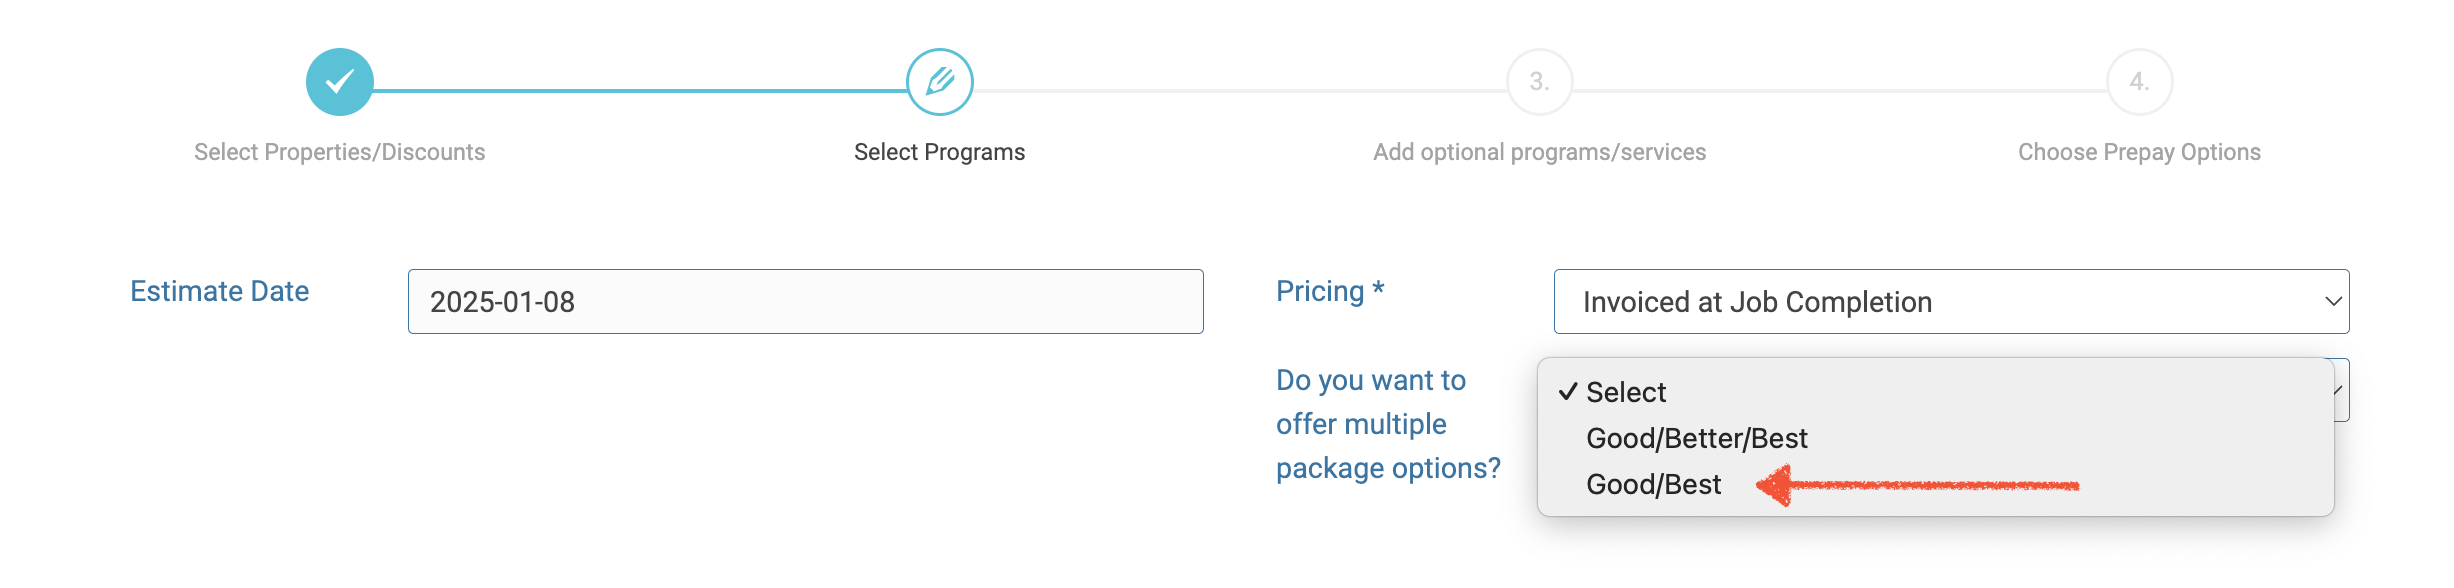
If you did not select package options, go ahead and select your primary programs and services in the dropdown menus.
If you did select package options, select each program and any additional services for each package you're offering (If you chose a program, you do not need to also choose the services in those programs, only any services you would also like to include in any of the packages).
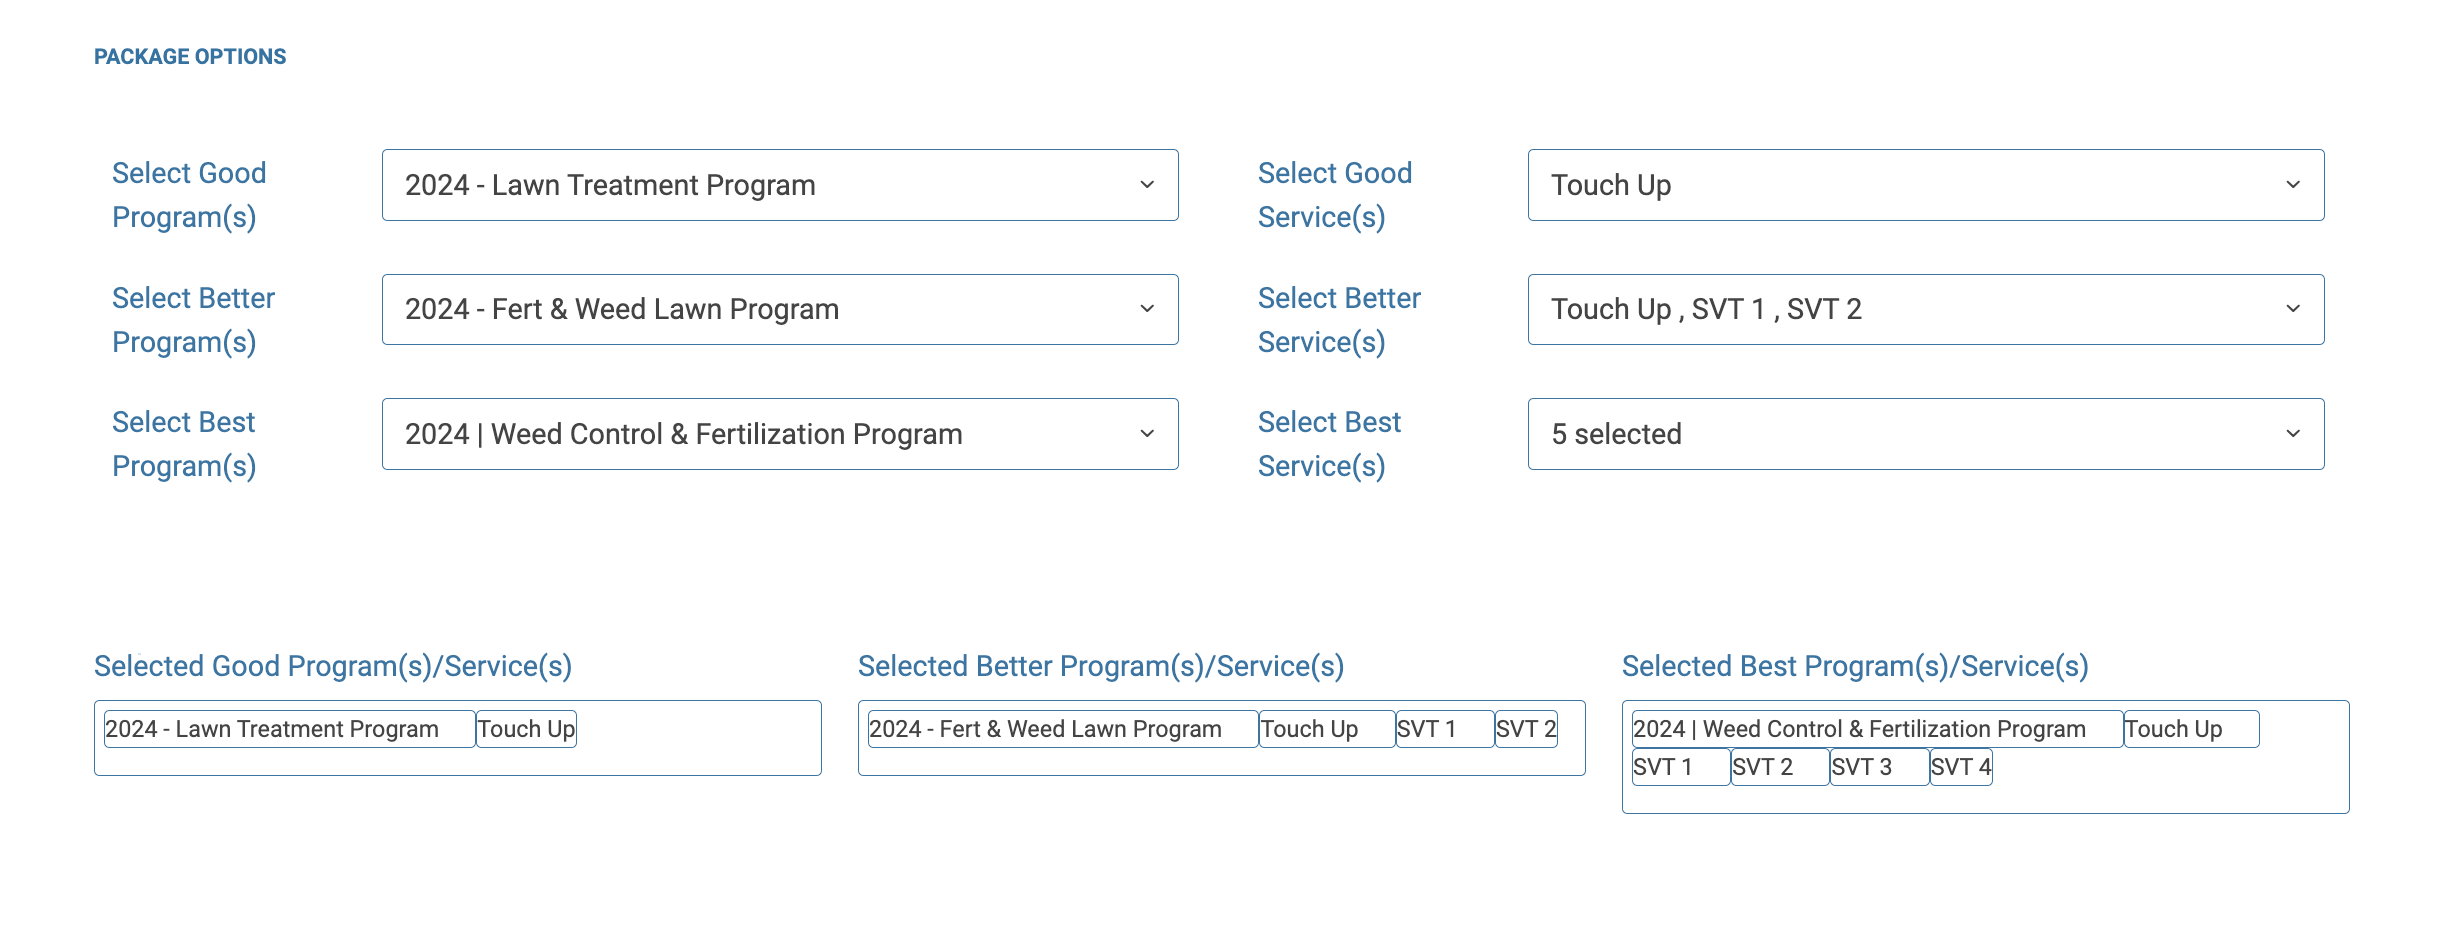
Add Optional Programs/Services
When you're finished creating your package options, you can add more "non-package" programs and services (this is not required)
Ex: You may be offering a standard Grub Control Service or Flea & Tick Program that's not part of the packages.
Enter price overrides for your packages (only if price overrides chosen when choosing properties):
Spraye will display system pricing. Enter your price override in the field on the right.
- Once you're finished entering your price overrides, you'll see the following options:

- Previous: Takes you back to the previous step if any changes need to be made
- Add optional programs/services: This will take you to a new screen to add optional services and programs. This is a great way to upsell other programs and services you may not usually offer.
- Add the Optional Programs.
- Enter price overrides for these programs.
- Skip to prepay options (shown below)
- Save as Draft: Save the estimate in draft status. You can continue to make changes to a draft estimate, or send it from the main estimates page.
- Submit & Send: This option will submit the estimate and send it directly to the customer.
Choose Prepay Options
- Select prepay program options for this estimate
- On this page, you are required to select the "prepay" version of the programs you're offering (this is not necessary for any services added outside of programs).
- IMPORTANT NOTE: If you have multiple programs chosen int he "Optional Programs" section, you will need to drag and drop the prepay options to match the order of the pay as you go options.
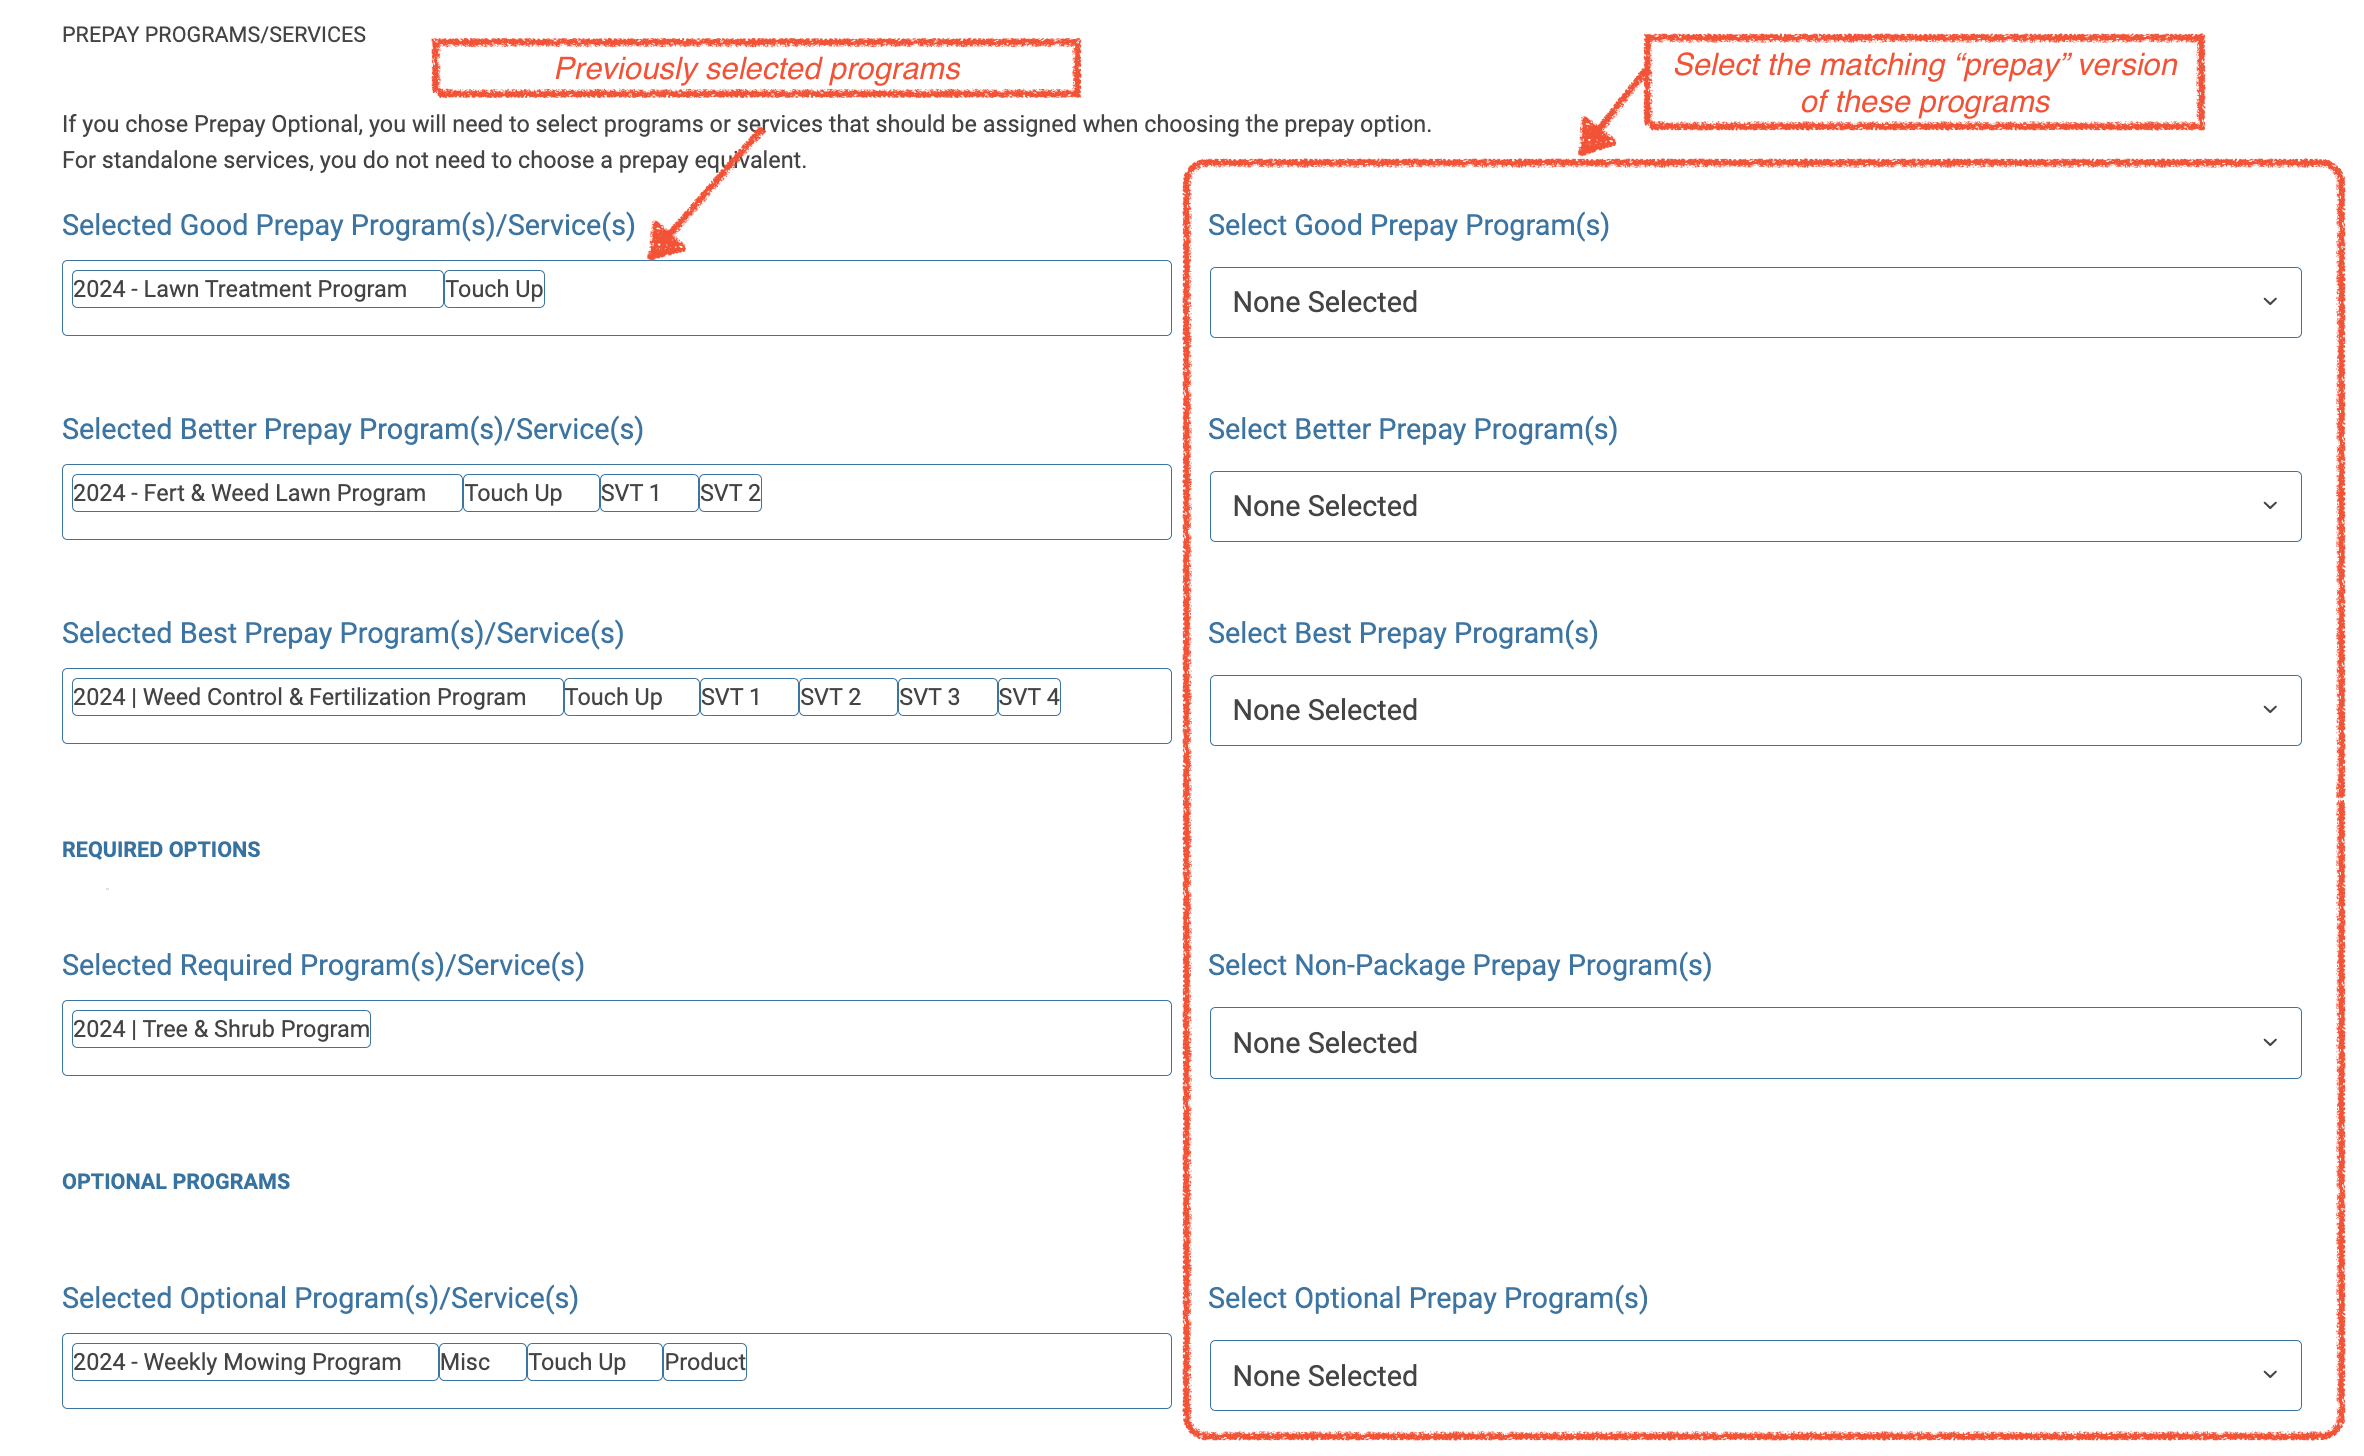
Finalizing the Estimate
After the final touches are made, you'll have the following options:
Previous: Go back to review or adjust entries.
Save as Draft: Save the estimate for future editing.
Submit and Send: Finalize and send the estimate to the customer.
FAQs
- Do I have to use a template? No. Click Build manually on the first screen to start from scratch. Templates are simply the fastest way to start.
- Will my existing templates and estimates still work? Yes. Your existing Interactive Estimate templates appear in the template list, and estimates you've already sent are not changed.
- What's the difference between Packages, Required and Optional Add-Ons? Packages: the customer picks one tier. Required: always included and can't be removed. Optional Add-Ons: the customer can choose to add them.
- Can I change the price for just this customer? Yes. Click Edit prices on the program and enter an Override, or apply a Coupon to an individual service. Overridden prices carry over to the customer's property when the estimate is accepted.
- Can different properties have different prices in a bulk estimate? Yes. Each property uses its own auto pricing, and you can override prices for individual properties in the bulk price table. Coupons on the green All properties row apply to everyone.
- Why don't I see the Monthly installments option? Monthly Installments must be set up for your company, and the program must have Offer Monthly Installment Billing enabled. See Monthly Installment Billing: Getting Started.
- What does "Skip this season" do? Any service you add there is skipped everywhere on the estimate, so you don't have to remove it from each program individually.
- How do I see what the customer will see? Click Show preview while building the offer, or check the Review & Send step, which shows the estimate exactly as the customer receives it.
- Can I accept estimates on behalf of customers in bulk? Yes. Select the estimates on the main Interactive Estimates list and click Bulk Accept (see Admin View above).
- What is "Send through SignWell"? It sends the estimate for electronic signature through SignWell instead of a standard email.
- Why is a program card outlined in orange with "Prepay: Choose…"? You're offering both Prepay and Pay as you go, and that program doesn't have a linked prepay program yet. Click Choose… and select the matching prepay program. See Choosing the prepay program above.
Need Help?
The new Estimate Builder is currently in Early Access, and your feedback is important to us.
If something doesn't look right, or you're unsure how to set up a particular estimate, please contact SPRAYE Support. We'd also love to hear about workflows or situations you think we haven't considered yet.